Imagine sinking your teeth into a cloud-soft, vibrant red velvet cookie, its delicate cocoa flavor mingling perfectly with a tangy whisper, all cradling a generous, velvety swish of creamy, sweet frosting. It’s a delightful dance of textures and tastes, a confectionary dream come true for your palate. This quick red velvet heart whoopie pies recipe always transports me back to my grandmother’s kitchen, where a little red food coloring and a lot of love could transform any ordinary day into a celebration, usually with a playful frosting smudge on my nose.
Reasons Why You’ll Love This Recipe
You’re about to discover a dessert that’s ridiculously easy to make, even if your baking skills are usually limited to pressing “start” on the microwave. These delightful red velvet treats boast a unique flavor profile, a perfect balance of mild cocoa and cream cheese tang that’s utterly irresistible. Beyond taste, their charming heart shape and vibrant color make them a stunning centerpiece for any gathering, transforming a simple dessert into a heartfelt gesture. Plus, they’re wonderfully versatile, allowing you to easily adjust presentation for any occasion.
Ingredients
Here’s what you need for this delicious dish:
- **All-purpose flour** Essential for giving our cookies their soft, cake-like structure. Ensure it’s fresh for the best results in these quick red velvet heart whoopie pies.
- **Baking soda** This little leavening agent works its magic, giving the cookies their signature fluffy rise and tender crumb.
- **Unsweetened cocoa powder** A vital component for that distinct red velvet flavor profile, providing a subtle depth and earthy richness without overpowering the sweetness.
- **Salt** Just a pinch of salt enhances all the other flavors, balancing the sweetness and bringing out the best in the cocoa.
- **Unsalted butter, softened** Crucial for both the cookie batter and the luxurious cream cheese filling. Softened butter creams beautifully with sugar, incorporating air for a light texture.
- **Granulated sugar** Provides sweetness and helps create that light, airy texture when creamed with butter.
- **Large egg** Acts as a binder, adding richness and moisture, and contributing to the structure of the cookies.
- **Vanilla extract** A splash of pure vanilla is a must, lending a warm, aromatic note that complements both the red velvet cookie and the tangy cream cheese filling.
- **Buttermilk** This is where the “tang” in red velvet comes from, reacting with the baking soda to give a tender crumb and a unique, slightly tart flavor that makes these heart-shaped delights so special.
- **Red food coloring** The star of the show for that iconic, vibrant red hue that makes these quick red velvet heart whoopie pies so visually appealing and festive.
- **Cream cheese, softened** The foundation of our dreamy filling. Ensuring it is softened allows for a smooth, lump-free frosting that beats beautifully with the butter.
- **Powdered sugar, sifted** The key to a smooth, sweet, and fluffy cream cheese filling. Sifting prevents lumps and creates a wonderfully silky texture.
All ingredients with their exact quantities can be found in the recipe card below.
Step-by-Step Instructions
Here’s a simple guide to help you prepare this delicious recipe:
Step 1: Get Ready to Bake
Begin by preheating your oven to a cozy 350°F (175°C). While the oven warms up, take a moment to line your baking sheets with parchment paper or silicone mats. This ensures your beautiful red velvet cookies won’t stick and will slide off effortlessly. In a medium bowl, whisk together the all-purpose flour, baking soda, unsweetened cocoa powder, and salt. Give it a good whisk until everything is evenly combined, then set this dry mixture aside for later.
Step 2: Crafting the Vibrant Cookie Batter
Now for the heart of the whoopie pies! In a large bowl, combine the softened unsalted butter and granulated sugar. Beat them together until the mixture turns light and fluffy – this step is crucial for airy cookies. Next, beat in the large egg and the vanilla extract until everything is wonderfully combined. In a separate, small bowl, pour in the buttermilk and stir in the vibrant red food coloring until it’s uniformly bright red. This color is what truly brings these quick red velvet heart whoopie pies to life.
Step 3: Bringing it All Together for Perfect Cookies
It’s time to unite our ingredients! Gradually add the whisked dry ingredients to the wet butter mixture, alternating with the red buttermilk mixture. Remember to begin and end with the dry ingredients. Mix gently until everything is just combined. Be careful not to overmix the batter; overmixing can lead to tough cookies, and we want tender, cake-like goodness for our heart-shaped whoopie pies.
Step 4: Piping and Baking Your Heart-Shaped Delights
Once your vibrant batter is ready, transfer it to a piping bag fitted with a large round tip. If you don’t have a piping bag, a spoon works just as well. Carefully pipe charming heart shapes onto your prepared baking sheets, ensuring you leave about 2 inches of space between each heart so they have room to spread. For extra uniform shapes, a heart-shaped cookie cutter can be used as a guide before piping. Bake these beauties for 10-12 minutes, or until the cookies are nicely set and spring back lightly when gently touched.
Step 5: Cooling and Whipping Up the Creamy Filling
As soon as they’re baked to perfection, remove the red velvet cookies from the oven. Let them cool on the baking sheets for just a few minutes, allowing them to firm up slightly. Then, carefully transfer them to a wire rack to cool completely. While your cookies are chilling out, it’s filling time! In a large bowl, beat the softened cream cheese and the softened unsalted butter together until the mixture is beautifully smooth and creamy. This is where those notes about room temperature ingredients really pay off!
Step 6: Assembling Your Dreamy Red Velvet Whoopie Pies
Gradually add the sifted powdered sugar to the cream cheese and butter mixture, beating until it’s fully incorporated and gorgeously fluffy. Stir in the vanilla extract for that final touch of warmth. Now for the best part: assembly! Once your cookies are completely cool – this is absolutely crucial to prevent your dreamy frosting from melting – spread or pipe a generous amount of cream cheese filling onto the flat side of one cookie. Then, gently top it with another cookie, forming a delightful sandwich. Repeat this heartwarming process with all your remaining cookies and filling. Serve these quick red velvet heart whoopie pies immediately to enjoy their tender texture and creamy filling, or store them for later.
Quick Tips for Whoopie Pie Perfection
Achieving perfect whoopie pies, particularly these delightful red velvet heart whoopie pies, is all about the details. First, always make sure your butter and cream cheese are at room temperature. Seriously, it makes all the difference for a smooth, lump-free, and utterly divine filling. A little planning goes a long way here. Second, when you’re mixing your cookie batter, resist the urge to overmix. Just combine until the ingredients are incorporated; too much mixing develops the gluten, leading to tougher cookies. We’re aiming for that soft, cake-like texture that truly sets these whoopie pies apart. Third, patience is a virtue, especially when it comes to cooling your cookies. Allowing them to cool completely on a wire rack ensures your exquisite cream cheese frosting won’t melt into a sad puddle, but rather hold its magnificent shape.
Finally, while these heart-shaped whoopie pies are fantastic for special occasions, don’t wait for a holiday to make them! They bring a little bit of joy to any ordinary Tuesday. If you’re feeling fancy, you can even dust them lightly with extra powdered sugar or decorate with a few sprinkles before serving.
Why Baking is Good for the Soul (and Your Taste Buds)
There’s something truly magical about baking, isn’t there? It’s not just about the end product, though these quick red velvet heart whoopie pies are a spectacular reward. It’s about the process – the meditative rhythm of creaming butter and sugar, the vibrant transformation of batter with a splash of red food coloring, and the sweet aroma that fills your home, instantly making it feel warmer and more inviting. Baking is a form of edible therapy, a creative outlet that allows you to slow down, focus on the present, and create something beautiful and delicious with your own two hands.
Sharing homemade treats, especially something as charming and delightful as these heart-shaped whoopie pies, is a gesture of love. Whether you’re making them for a loved one, a friend, or simply to treat yourself after a long week, the act of giving and receiving such a heartfelt creation deepens connections and spreads happiness. Imagine the smiles when someone receives a plate of these tender, creamy, and visually stunning red velvet delights. It’s more than just a dessert; it’s an experience, a memory in the making, and a testament to the simple joys of a home-baked treat.
Common Questions About Quick Red Velvet Heart Whoopie Pies Recipe
Got questions about perfecting your batch of these delightful red velvet treats? You’re not alone! Here are some common queries we hear.
**Can I make the cookies ahead of time?**
Absolutely! The cookies can be baked a day in advance. Once completely cooled, store them in an airtight container at room temperature. Then, you can whip up the cream cheese filling and assemble them closer to serving time for maximum freshness. This makes preparing these quick red velvet heart whoopie pies even more convenient.
**How do I store leftover whoopie pies?**
Once assembled, these whoopie pies are best stored in an airtight container in the refrigerator for up to 3 days. This keeps the cream cheese filling fresh and the cookies perfectly moist. They taste incredible chilled, too!
**What if I don’t have buttermilk?**
While buttermilk is ideal for its tang and tenderizing properties, you can create a decent substitute. For 1 cup of buttermilk, measure 1 tablespoon of white vinegar or lemon juice into a liquid measuring cup, then fill the rest of the cup with regular milk (any fat percentage will work). Stir it gently and let it sit for about 5-10 minutes until it slightly curdles. Voila! Instant buttermilk substitute.
**My cookies spread too much. What went wrong?**
Cookie spreading can be due to a few factors. Ensure your oven temperature is accurate; a too-cool oven can cause overspreading. Also, chilling the batter for about 15-20 minutes before piping can help the cookies hold their shape better, especially important for those perfect heart shapes in this quick red velvet heart whoopie pies recipe. Over-softened butter can also contribute to spreading, so ensure it’s just softened, not melted.
**Can I freeze whoopie pies?**
Yes, you can! For best results, freeze the unfrosted cookies separately. Once completely cooled, place them in an airtight freezer-safe bag or container for up to 2-3 months. Thaw them at room temperature before filling with freshly made cream cheese frosting. You can also freeze assembled whoopie pies in an airtight container for up to 1 month, thawing them in the refrigerator before serving.
Nutritional Information (Per serving)
- **Calories:** 350
- **Protein:** 3g
- **Carbs:** 55g
- **Fat:** 14g
Servings: 12 whoopie pies
Improving the Cooking Method
For perfect Quick Red Velvet Heart Whoopie Pies, timing is key. Ensure your cookies are fully cooled on a wire rack before even thinking about the filling. This crucial step prevents the creamy dream cheese frosting from melting into a messy puddle and guarantees a beautiful, stable dessert sandwich.
Decorate Your Dish with Your Personal Touch
To personalize your whoopie pies, consider simple ingredient swaps. Instead of classic vanilla extract in both the cookies and filling, try almond extract for a nutty twist, or peppermint extract for a festive flair. You can also experiment with the red food coloring by using different shades or even gel colors for a more vibrant hue in your red velvet cookies.
Smart Tips for Storage and Reheating
To maintain the irresistible softness of these red velvet treats and the luscious creaminess of the filling, store them in an airtight container. Keep the whoopie pies chilled in the refrigerator for up to three days. This method prevents them from drying out and keeps the frosting from becoming too soft or firm, ensuring every bite is as intended.
Practical Chef Advice
My grandmother once made a batch of these for my high school Valentine’s dance, and I accidentally dropped the entire plate! She just laughed, whipped up another batch, reminding me that some joy is always worth a second attempt.
Final Thoughts
Bringing these delightful treats to life is truly a joy. From the vibrant red batter to the tender, cake-like texture and the rich, tangy cream cheese filling, every bite of these whoopie pies is a celebration. This Quick Red Velvet Heart Whoopie Pies Recipe offers a simple yet elegant way to create a charming dessert that’s perfect for sharing or simply savoring yourself. Don’t hesitate to whisk up a batch of these beautiful heart-shaped delights and experience the pure indulgence firsthand. Your taste buds will thank you!
PrintQuick Red Velvet Heart Whoopie Pies Recipe

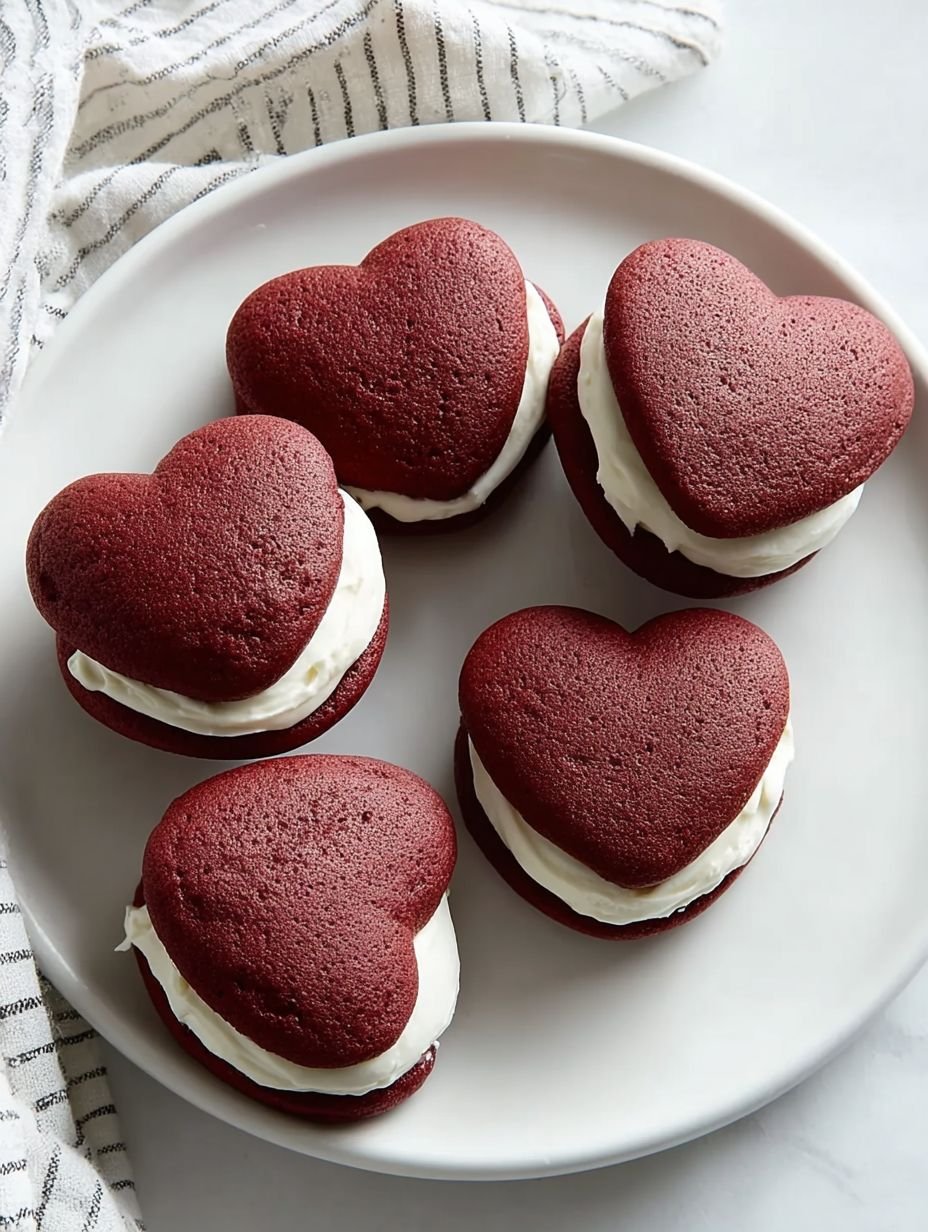
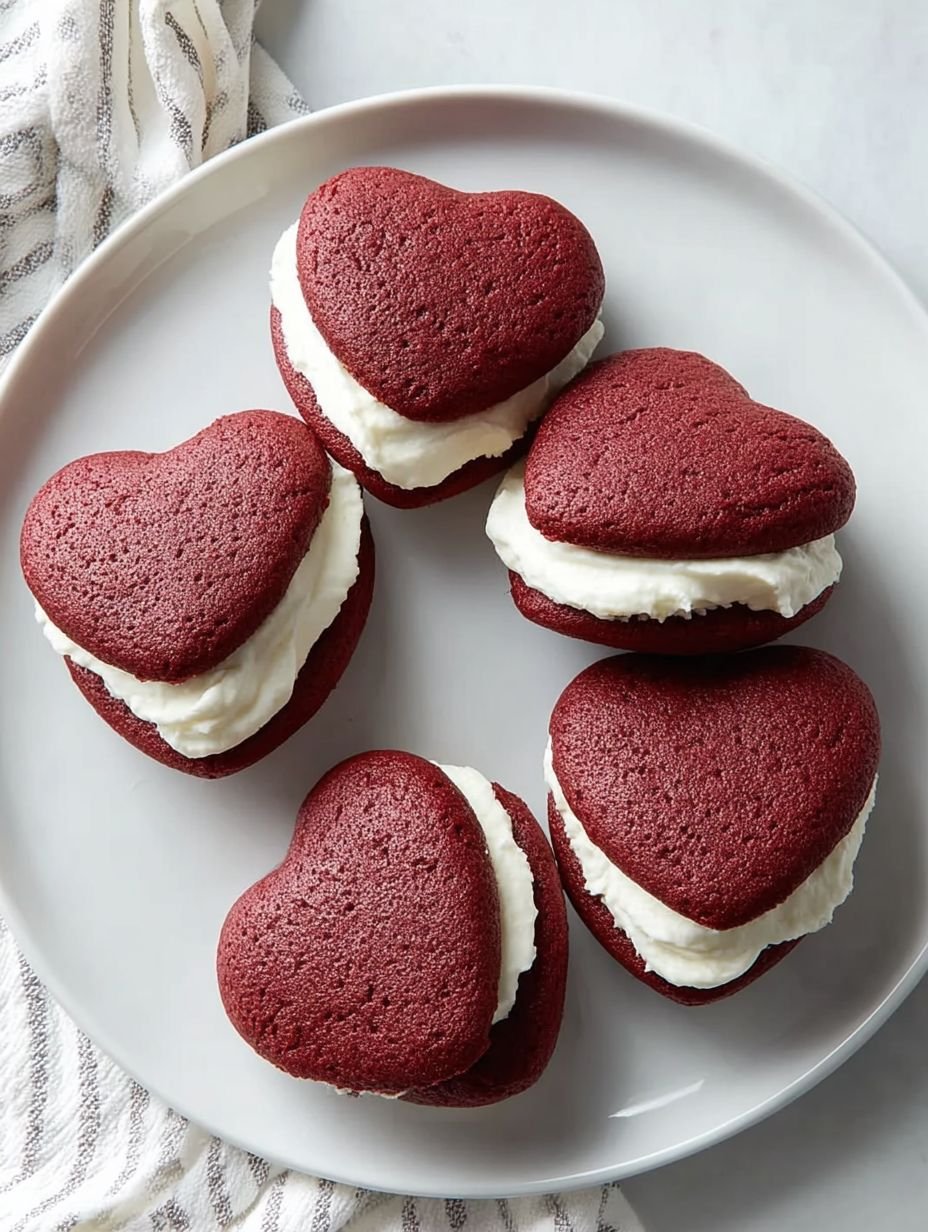
These delightful heart-shaped whoopie pies feature soft, cake-like red velvet cookies with a subtle cocoa flavor and a hint of tang. They are generously filled with a smooth, creamy, and slightly tangy cream cheese frosting, creating a balanced and indulgent treat. Each component is baked to perfection and then assembled to form a charming, handheld dessert.
- Prep Time: 25 minutes
- Cook Time: 20 minutes
- Total Time: 45 minutes
- Yield: 12 whoopie pies 1x
Ingredients
- *For the Red Velvet Cookies:*
- 2 ½ cups all-purpose flour
- 1 teaspoon baking soda
- 1 teaspoon unsweetened cocoa powder
- ½ teaspoon salt
- ½ cup unsalted butter, softened
- 1 ½ cups granulated sugar
- 1 large egg
- 1 teaspoon vanilla extract
- 1 cup buttermilk
- 2 tablespoons red food coloring
- *For the Cream Cheese Filling:*
- 8 ounces cream cheese, softened
- ½ cup unsalted butter, softened
- 4 cups powdered sugar, sifted
- 1 teaspoon vanilla extract
Instructions
- Preheat oven to 350°F (175°C). Line baking sheets with parchment paper or silicone mats.
- In a medium bowl, whisk together the flour, baking soda, cocoa powder, and salt. Set aside.
- In a large bowl, cream together the softened butter and granulated sugar until light and fluffy. Beat in the egg and vanilla extract until well combined.
- In a separate small bowl, combine the buttermilk and red food coloring.
- Gradually add the dry ingredients to the wet ingredients, alternating with the buttermilk mixture, beginning and ending with the dry ingredients. Mix until just combined, being careful not to overmix.
- Transfer the batter to a piping bag fitted with a large round tip, or use a spoon. Pipe heart shapes onto the prepared baking sheets, leaving about 2 inches between each.
- Bake for 10-12 minutes, or until the cookies are set and spring back lightly when touched.
- Remove from the oven and let cool on the baking sheets for a few minutes before transferring to a wire rack to cool completely.
- *For the Cream Cheese Filling:* In a large bowl, beat the softened cream cheese and butter together until smooth and creamy.
- Gradually add the sifted powdered sugar, beating until fully incorporated and fluffy. Stir in the vanilla extract.
- Once the cookies are completely cool, spread or pipe a generous amount of cream cheese filling onto the flat side of one cookie. Top with another cookie to form a sandwich.
- Repeat with the remaining cookies and filling. Serve immediately or store.
Notes
Ensure butter and cream cheese are at room temperature for a smooth filling.
Do not overmix the cookie batter to keep the whoopie pies tender.
Use a heart-shaped cookie cutter as a guide for piping if you prefer uniform shapes.
Allow cookies to cool completely before filling to prevent the frosting from melting.
Store whoopie pies in an airtight container in the refrigerator for up to 3 days.
Nutrition
- Calories: 350
- Fat: 14g
- Carbohydrates: 55g
- Protein: 3g
FAQs
Why is room temperature butter and cream cheese essential for the filling?
Ensuring your unsalted butter and cream cheese are softened to room temperature is crucial for achieving the perfect creamy texture in the filling. When these ingredients are at the same temperature, they beat together smoothly and seamlessly, preventing lumps and creating a light, airy consistency. This allows the powdered sugar to incorporate fully, resulting in a smooth, fluffy, and spreadable cream cheese filling that perfectly complements the soft red velvet cookies. Attempting to use cold ingredients will likely lead to a lumpy, difficult-to-work-with frosting.
How can I ensure my red velvet cookies are tender and cake-like?
The key to achieving tender, cake-like red velvet cookies lies in careful mixing. When gradually adding the dry ingredients to the wet, alternating with the buttermilk mixture, it is vital to mix until just combined. Overmixing the batter can develop the gluten in the flour too much, leading to a tougher, chewier cookie texture rather than the desired soft and delicate crumb. Following this step precisely will help maintain the tender consistency expected from these delightful whoopie pies.
What is the best way to store these whoopie pies after assembly?
To keep your whoopie pies fresh and delicious, proper storage is important. Once they are assembled with their creamy filling, transfer them to an airtight container. Store the container in the refrigerator, where the whoopie pies will remain fresh for up to three days. Storing them in this manner helps preserve the texture of the cookies and prevents the cream cheese filling from spoiling, ensuring each treat is as delightful as the first.
Is there a simple method for piping uniform heart shapes for the cookies?
Achieving uniform heart shapes for your whoopie pies is straightforward. The recipe instructs you to transfer the batter to a piping bag fitted with a large round tip. You can then pipe the heart shapes directly onto your prepared baking sheets. If you desire even more consistent shapes, a helpful tip is to use a heart-shaped cookie cutter as a guide. Simply place the cutter on the parchment paper or silicone mat, and pipe the batter within its outline before carefully lifting the cutter away.