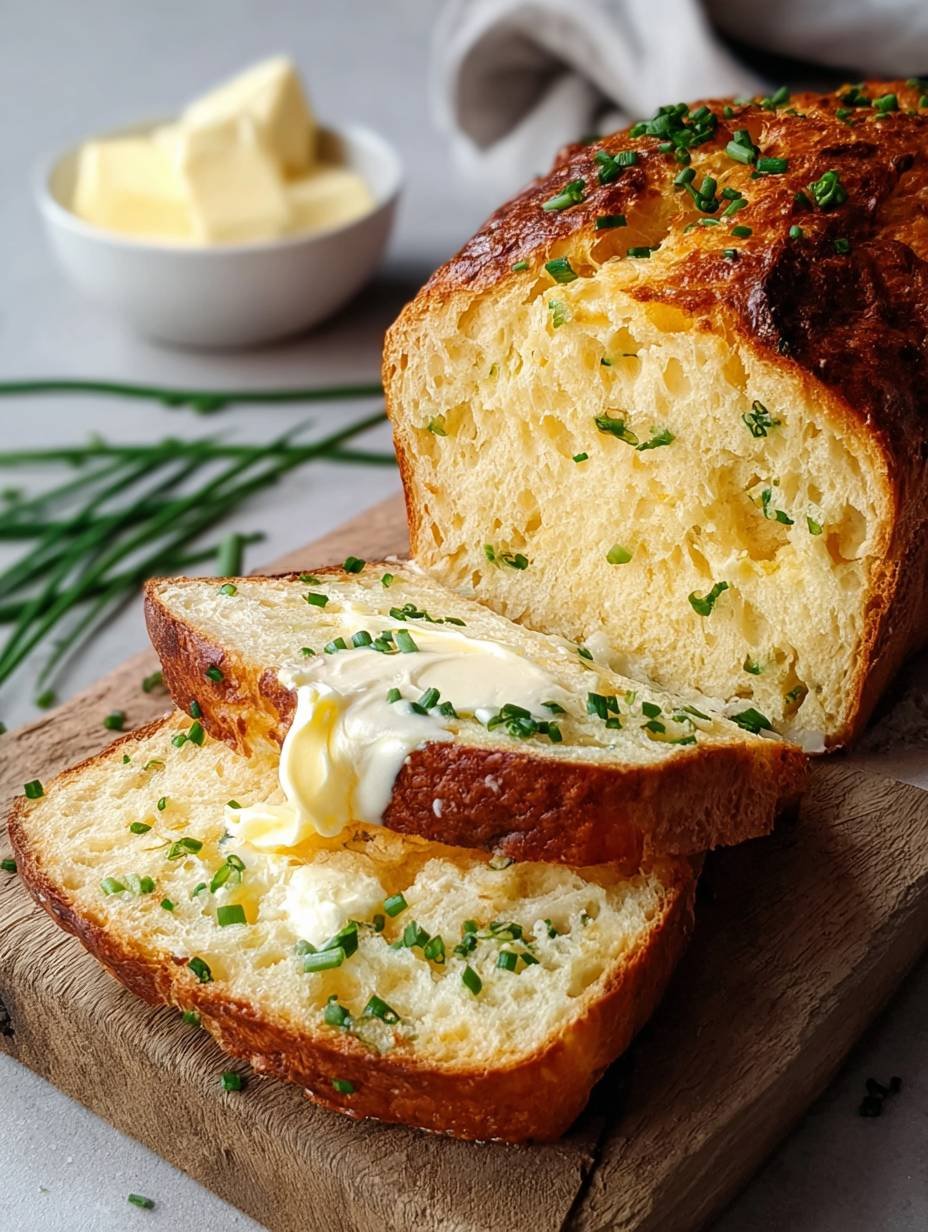
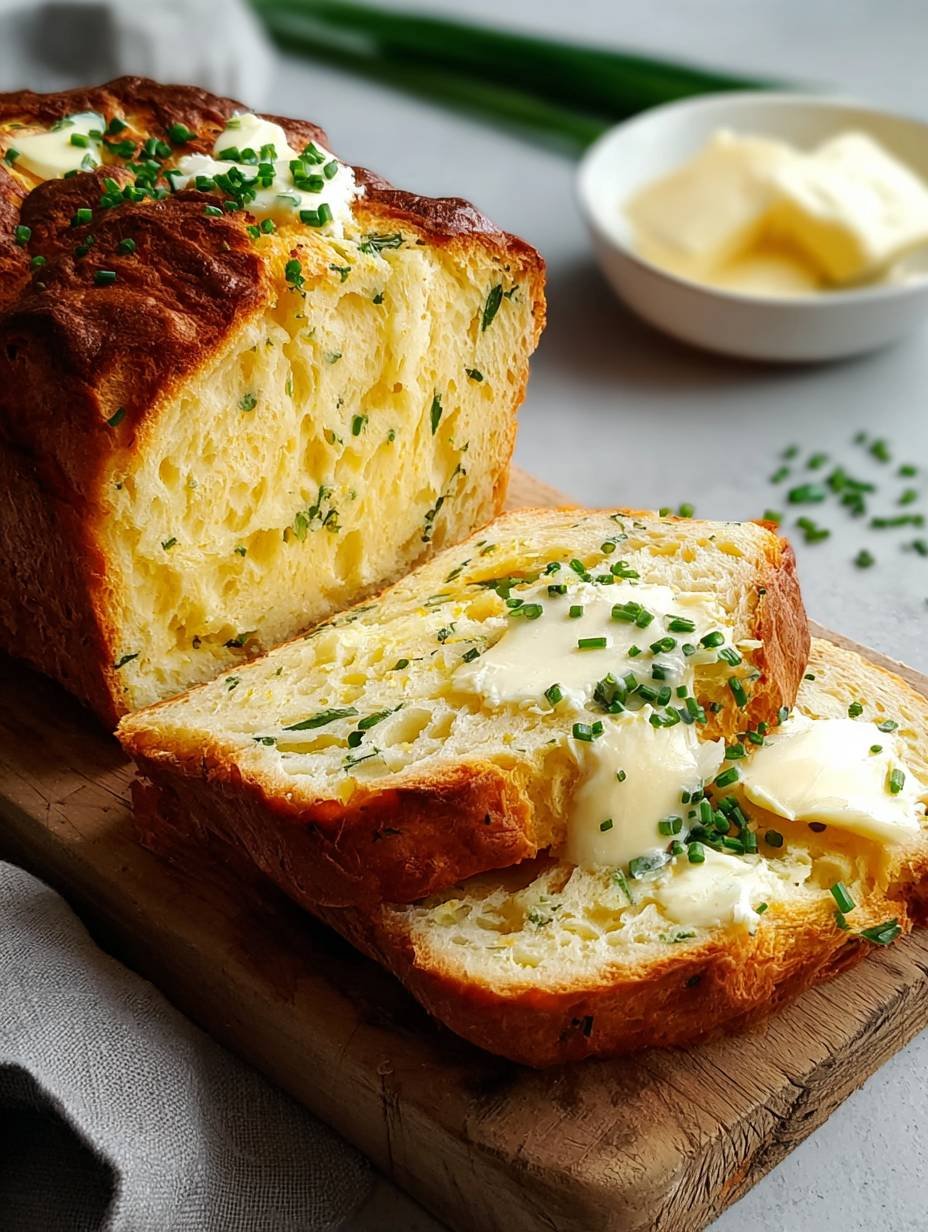
The aroma of freshly baked bread, still warm from the oven, with its subtle savory notes and tender crumb, is a simple pleasure that truly elevates any meal. Imagine a loaf that’s not just bread, but a fluffy, chive-speckled dream.
My grandmother used to say the best things in life were often the simplest, and she’d often whip up a quick bread that always brought smiles and full bellies. This recipe, I swear, channels her spirit, albeit with a modern, chive-infused twist.
Reasons Why You’ll Love This Recipe
You are about to discover a recipe that’s effortlessly easy to prepare, yielding a loaf with a unique flavor profile thanks to the tangy cottage cheese and fragrant chives. Its stunning golden-brown appearance makes it a showstopper at any table, and its versatility means it can be served as the perfect dinner side, toasted for breakfast, or even as the base for a delightful sandwich. This simple bread recipe is a true kitchen hero, ready to impress with minimal fuss.
The Secret Ingredient for the Best Chive Bread Loaf
Before we dive into the nitty-gritty of baking this utterly delightful loaf, let’s chat about what makes this particular chive bread recipe so special. It’s not just about the herbaceous burst of fresh chives; there’s a secret weapon quietly working its magic in the background: cottage cheese. Now, before you wrinkle your nose, hear me out! The cottage cheese melts invisibly into the dough during baking, imparting an incredible tenderness, moisture, and a slight, irresistible tang that elevates this bread far beyond your average dinner accompaniment. It’s the subtle difference that transforms a good loaf into the best chive bread loaf you’ll ever make. This addition is key to achieving that wonderfully soft and tender crumb, making every slice a truly comforting experience.
Gathering Your Ingredients for a Perfect Loaf
Preparing an easy chive bread loaf begins with having the right components ready. Gathering your ingredients and ensuring they are at the correct temperature can make all the difference in achieving that wonderfully soft and airy texture. You’ll be surprised how simple it is to bring together these everyday items for such an extraordinary outcome. This savory bread recipe uses common pantry staples alongside fresh herbs to create something truly special, making it an ideal perfect dinner side.
Here’s what you need for this delicious dish:
All ingredients with their exact quantities can be found in the recipe card below.
Step-by-Step Instructions
Here’s a simple guide to help you prepare this delicious recipe:
Step 1: Activate the Yeast Mixture
In a large mixing bowl, combine the specified amount of warm milk, granulated sugar, and the entire packet of active dry yeast. Gently stir these together. Allow the mixture to rest undisturbed for 5 to 10 minutes until a noticeable layer of foam forms on the surface. This foam indicates that the yeast is active and ready to perform its magic, ensuring your loaf will rise beautifully.
Step 2: Combine Wet Ingredients
Once your yeast mixture is foamy, add the full-fat cottage cheese, the large egg, the melted and cooled unsalted butter, and the teaspoon of salt to the bowl. Use a spoon or spatula to stir these ingredients thoroughly until they are completely well combined and integrated with the yeast mixture. This step builds the foundation of flavor and moisture for our easy chive bread loaf.
Step 3: Form and Knead the Dough
Gradually begin adding the all-purpose flour to the wet mixture, mixing it in increments until a shaggy, somewhat rough dough forms in the bowl. Once it’s too thick to stir easily, transfer the dough onto a clean, lightly floured work surface. Knead the dough by hand for 8 to 10 minutes. The goal is to develop the gluten, transforming the shaggy mass into a smooth, elastic, and resilient dough that springs back when gently poked.
Step 4: First Rise for Your Savory Bread
Lightly oil a clean large bowl. Place the kneaded dough into the oiled bowl, turning it once to ensure it’s completely coated with a thin layer of oil. This prevents it from sticking and drying out. Cover the bowl securely with plastic wrap or a clean kitchen towel. Find a warm, draft-free spot in your kitchen and let the dough rise for 1 to 1.5 hours, or until it has visibly doubled in size. Patience here will be rewarded with a light and airy texture.
Step 5: Incorporate Chives and Shape the Loaf
After the first rise, gently punch down the risen dough to release the air. Turn the dough out onto a lightly floured surface. Now, it’s time for the star flavor: knead in the 1/4 cup of finely chopped fresh chives. Work the chives into the dough until they are evenly distributed, ensuring every slice of this easy chive bread loaf gets that wonderful herbaceous punch. Once the chives are in, shape the dough into a cohesive loaf form.
Step 6: Second Rise and Preparation for Baking
Place the shaped chive bread loaf into a greased 9×5 inch loaf pan. Cover the pan loosely and let it rise again in a warm spot for another 30 to 45 minutes, or until it has nearly doubled in size once more. While the loaf is performing its second rise, preheat your oven to 375F (190C). In a small separate bowl, whisk the egg yolk with 1 tablespoon of water to create an egg wash. Just before baking, gently brush the top of the risen loaf with this egg wash for a golden, shiny crust.
Step 7: Bake to Golden Perfection
Carefully place the loaf pan into the preheated oven. Bake for 30 to 35 minutes, or until the top is beautifully golden brown and the internal temperature of the bread, when measured with an instant-read thermometer, registers between 200-210F (93-99C). If you notice the top browning too quickly during the baking process, loosely tent the pan with a piece of aluminum foil to prevent over-browning.
Step 8: Cool, Slice, and Serve
Once baked, remove the perfect dinner side bread from the oven. Let it cool in the pan for 10 minutes. This allows the internal structure to set properly. After 10 minutes, carefully transfer the loaf from the pan to a wire rack to cool completely. Slicing too early can result in a gummy texture. Once cooled, slice your amazing homemade chive bread loaf and serve, garnished with additional fresh chives if desired, to enjoy the soft, tender texture and savory notes.
Mastering the Rise: Tips for a Flawless Chive Loaf
Creating the best chive bread loaf truly is an art, but don’t worry, it’s a very forgiving art! To ensure your tender chive loaf turns out absolutely perfect every single time, there are a few simple but crucial tips to keep in mind. These little nuggets of wisdom will help you navigate the baking process like a seasoned pro, ensuring a successful and delicious outcome for your easy chive bread loaf.
Yeast and Temperature Matters
The success of any yeast bread hinges on active yeast and proper temperatures. Always ensure your active dry yeast is fresh; old yeast simply won’t give you the rise you desire. When activating the yeast with warm milk, aim for a temperature between 105-115F (40-46C). Too cold, and the yeast won’t wake up; too hot, and you’ll kill it, resulting in a flat, dense loaf. Room temperature ingredients also play a significant role. Cold cottage cheese or an egg straight from the fridge can shock the yeast and hinder its activity, making the dough rise less effectively. Plan ahead and let these ingredients sit out for about 30 minutes before you start mixing.
The Golden Glow: Achieving the Perfect Crust
That irresistible golden-brown crust isn’t just for looks; it adds a delightful texture contrast to the soft interior of this homemade chive loaf. For an extra golden and slightly crispier crust, brush the top of your risen loaf with the egg wash just before it goes into the oven. This simple step creates a beautiful sheen and helps achieve that desirable color and texture that makes this easy chive bread loaf so appealing. If you notice your loaf is browning too rapidly during the bake, a loose tent of aluminum foil can be your best friend, preventing over-browning while the inside finishes cooking to perfection.
Serving Suggestions: Making Your Chive Bread Loaf a Dinner Star
This incredible chive-infused bread isn’t just a simple loaf; it’s a versatile star ready to elevate any meal. As a perfect dinner side, it complements a wide array of dishes, from hearty stews to light salads. Imagine a slice slathered with a knob of butter melting into its warm, tender crumb alongside a comforting bowl of chicken soup. It’s equally delightful next to roasted chicken or a pan-seared piece of fish, soaking up all those delicious juices. For a brunch spread, toast a slice and top it with cream cheese and extra fresh chives, or even a poached egg. Its savory profile makes it an excellent companion to almost anything, effortlessly enhancing the dining experience.
Storing Your Delicious Creation
Once you’ve baked this magnificent easy chive bread loaf, you’ll want to keep it fresh to enjoy for as long as possible. The good news is that this moist cottage cheese bread stores wonderfully. Simply place any leftover bread in an airtight container or a resealable bag. At room temperature, it will remain fresh and delicious for up to 3 days. For longer storage, you can easily freeze slices or the entire loaf. Wrap it tightly in plastic wrap, then again in aluminum foil, and store it in the freezer for several weeks. When you’re ready to enjoy, simply thaw at room temperature or warm gently in the oven for that freshly baked taste and aroma.
Flavor Adventures: Customizing Your Savory Loaf
While the easy chive bread loaf, with its delicate oniony notes, is absolutely perfect as is, it also offers a fantastic canvas for culinary creativity. The beauty of this cottage cheese bread is its adaptability. If you’re feeling adventurous or simply want to switch things up, consider experimenting with other fresh herbs. Dill would add a bright, slightly tangy flavor that pairs beautifully with the richness of the bread, making it a wonderful accompaniment to seafood or poultry. Parsley offers a fresh, clean taste that would highlight the savory depth without overpowering it. You could even try a blend of herbs, like a touch of thyme or rosemary, for a more robust and aromatic homemade loaf. Just remember to finely chop your chosen herbs to ensure even distribution and a pleasant texture throughout the bread.
Nutrition Insights for Your Dinner Side
Enjoying a slice of this homemade chive bread loaf means savoring a delicious and satisfying perfect dinner side. It’s helpful to know what you’re fueling your body with. Each serving of this delightful bread offers a balanced nutritional profile that fits well into a wholesome meal.
Here’s the breakdown per serving (based on 10-12 slices per loaf):
- Calories: 220
- Protein: 9g
- Carbs: 32g
- Fat: 7g
This information highlights that this easy chive bread loaf provides a good source of carbohydrates for energy and a respectable amount of protein, making it a substantial and tasty addition to your dinner plate.
The Joy of Baking Your Own Easy Chive Bread Loaf
There’s an undeniable satisfaction that comes from baking your own bread, and this easy chive bread loaf recipe delivers that joy in spades. From the moment the yeast starts to foam to the heavenly aroma filling your kitchen, and finally, to that first tender bite, it’s a rewarding experience. This isn’t just a recipe for bread; it’s an invitation to create warmth, comfort, and deliciousness in your home. Whether you’re a seasoned baker or just starting your journey, this perfect dinner side bread is designed for success. So, roll up your sleeves, gather those ingredients, and get ready to bake the best chive bread loaf you’ve ever tasted! It’s truly a simple pleasure that enhances any meal.
Improving the Cooking Method
For the perfect Easy Best Chive Bread Loaf – Perfect Dinner Side, ingredient temperatures are key. Ensure warm milk (105-115F) for yeast activation. Other components, like cottage cheese and egg, need to be at room temperature. This promotes optimal rising, yielding that delightful light, airy texture.
Decorate Your Dish with Your Personal Touch
Your bread loaf is delightful, but personalize it! Knead in fresh dill or parsley for an aromatic twist. Garnish the finished Easy Best Chive Bread Loaf with more of your chosen herb. This adds a visual pop and unique flavor.
Smart Tips for Storage and Reheating
Keep your bread loaf wonderfully soft. Store it in an airtight container at room temperature for up to three days. For longer enjoyment, slice and freeze the bread. Thaw slices at room temperature, or gently warm them. This revives its delightful texture, making this perfect dinner side fresh again.
Practical Chef Advice
I remember baking this chive bread on a chilly autumn evening. The aroma filled the house, drawing my neighbor over with a curious knock. We ended up sharing warm slices, butter melting, proving its power to connect.
Final Thoughts
This delightful Easy Best Chive Bread Loaf – Perfect Dinner Side is truly a versatile and comforting addition to any meal, offering a tender crumb and a delicate savory aroma. The cottage cheese adds an exceptional moistness and subtle tang, while fresh chives infuse every slice with vibrant, herbaceous flavor. It’s a comforting creation that promises to elevate any meal, from a casual weeknight dinner to a special gathering. Imagine the golden crust, the soft interior, and that incredible chive fragrance filling your kitchen. Don’t just read about this incredible bread—experience it! Gather your ingredients and bake this beautiful loaf today; your taste buds will thank you.
PrintEasy Best Chive Bread Loaf – Perfect Dinner Side

This Cottage Cheese Bread offers a wonderfully soft and tender crumb, enriched by the addition of cottage cheese for a subtle tang and moist texture. Baked to a golden perfection, its crust provides a gentle contrast to the airy interior, which is speckled with fresh chives, adding a delicate savory aroma. It’s a comforting loaf, ideal for serving warm with a spread of butter.
- Prep Time: 25 minutes
- Cook Time: 35 minutes
- Total Time: 1 hour
- Yield: 10-12 slices 1x
Ingredients
- 3 cups (360g) all-purpose flour, plus more for dusting
- 1 packet (2 1/4 teaspoons) active dry yeast
- 1 tablespoon granulated sugar
- 1 teaspoon salt
- 1 cup (240g) full-fat cottage cheese, at room temperature
- 1/2 cup (120ml) warm milk (105-115F / 40-46C)
- 1 large egg, at room temperature
- 1/4 cup (56g) unsalted butter, melted and cooled
- 1/4 cup fresh chives, finely chopped, plus more for garnish
- 1 egg yolk, for egg wash
Instructions
- In a large bowl, combine the warm milk, sugar, and yeast. Let sit for 5-10 minutes until foamy.
- Add the cottage cheese, egg, melted butter, and salt to the yeast mixture. Stir until well combined.
- Gradually add the flour, mixing until a shaggy dough forms. Turn the dough out onto a lightly floured surface and knead for 8-10 minutes, or until smooth and elastic.
- Place the dough in a lightly oiled bowl, turning once to coat. Cover with plastic wrap or a clean kitchen towel and let rise in a warm place for 1-1.5 hours, or until doubled in size.
- Gently punch down the dough. Turn it out onto a lightly floured surface and knead in the 1/4 cup of chopped chives until evenly distributed.
- Shape the dough into a loaf and place it into a greased 9×5 inch loaf pan. Cover and let rise again for 30-45 minutes, or until nearly doubled.
- Preheat oven to 375F (190C).
- In a small bowl, whisk the egg yolk with 1 tablespoon of water for an egg wash. Brush the top of the risen loaf with the egg wash.
- Bake for 30-35 minutes, or until golden brown and the internal temperature reaches 200-210F (93-99C). If the top browns too quickly, loosely tent with foil.
- Remove from oven and let cool in the pan for 10 minutes before transferring to a wire rack to cool completely. Slice and serve, garnished with additional chives if desired.
Notes
Ensure your yeast is fresh for optimal rising.
Room temperature ingredients help the dough rise more effectively.
For an extra golden crust, brush with egg wash just before baking.
Store leftover bread in an airtight container at room temperature for up to 3 days, or freeze for longer storage.
Experiment with other fresh herbs like dill or parsley for a different flavor profile.
Nutrition
- Calories: 220
- Fat: 7g
- Carbohydrates: 32g
- Protein: 9g
FAQs
How do I know if my yeast is active and ready to use?
To ensure your active dry yeast is fresh and working effectively for this recipe, you’ll perform a simple test, as described in the first step of the instructions. You combine the warm milk (specifically between 105-115F or 40-46C), granulated sugar, and the yeast itself. After letting this mixture sit for 5-10 minutes, you should observe a foamy layer forming on the surface. This foam indicates that the yeast is alive and active, ready to help your Easy Best Chive Bread Loaf rise beautifully. If you don’t see any foam, your yeast may be old or inactive, and it’s best to use a fresh packet to ensure a successful bake.
Why is it important for the cottage cheese and egg to be at room temperature?
Using room temperature ingredients, such as the full-fat cottage cheese and the large egg, is crucial for achieving the best results with this bread. When ingredients are at room temperature, they integrate more smoothly and evenly into the dough, creating a more cohesive mixture. More importantly, warm ingredients help to activate the yeast more effectively. Yeast thrives in a warm environment, which encourages it to produce carbon dioxide gases, essential for the dough to rise properly and achieve that wonderfully soft, airy texture in your Easy Best Chive Bread Loaf. This simple preparation step contributes significantly to the loaf’s overall rise and final texture.
What’s the best way to tell when my chive bread is fully baked?
To confirm that your chive bread is perfectly baked, you should rely on both visual cues and an internal temperature check as outlined in the baking instructions. The loaf should develop a beautiful golden brown color on top after baking for 30-35 minutes at 375F (190C). For absolute certainty, use a digital thermometer to measure the internal temperature of the bread. It should register between 200-210F (93-99C) when inserted into the center of the loaf. If the top appears to be browning too quickly before it’s fully baked, you can loosely tent the loaf with foil to prevent over-browning while it finishes cooking.
Can I use different fresh herbs in this bread recipe?
Yes, absolutely! While this recipe specifically calls for 1/4 cup of finely chopped fresh chives, plus more for garnish, you can certainly experiment with other fresh herbs to alter the flavor profile of your bread. The recipe notes suggest trying dill or parsley as excellent alternatives. If you choose to substitute, ensure you use fresh herbs, finely chopped, and incorporate them into the dough during step 5, just as you would the chives. This flexibility allows you to customize the savory notes to your preference, creating a delightful variation of this wonderful bread.