Imagine sinking your teeth into a rich, fudgy chocolate brownie, perfectly baked, then encountering a creamy swirl of vibrant green frosting that tastes like pure springtime joy. Each bite offers a delightful dance of textures, from the dense base to the smooth, sweet topping.
I still remember the year I tried to bake Easter treats and ended up with something resembling a mudslide rather than a masterpiece; thankfully, this recipe saves us all from such culinary catastrophes, delivering festive perfection with ease.
Why You’ll Love This Recipe
You’re about to discover a recipe that’s effortlessly charming, making it simple to create a show-stopping dessert without breaking a sweat. Its unique combination of a deeply satisfying chocolate brownie and a fresh, subtly sweet green frosting offers a flavor profile that’s both comforting and celebratory. Adorned with delightful spring-themed decorations, these treats don’t just taste amazing, they look like edible works of art, bringing smiles to every face. Plus, the fun of decorating allows for simple personalization, making each batch uniquely yours.
Ingredients
Here’s what you need for this delicious dish:
The complete ingredient list, including quantities, can be found directly under the recipe card.
Step-by-Step Instructions
Follow these simple steps to prepare this delicious dish:
Prepare Your Baking Sanctuary
Step 1: Get Ready to Bake
Begin by preheating your oven to 350°F (175°C). Next, line an 8×8 inch (20×20 cm) baking pan with parchment paper, allowing an overhang on two sides. This thoughtful step will make it incredibly easy to lift your baked brownies from the pan later, ensuring a clean and simple removal.
Crafting the Perfect Brownie Base
Step 2: Combine Wet Ingredients for Fudgy Goodness
In a medium-sized bowl, whisk together the melted unsalted butter and granulated sugar until they are thoroughly combined. This initial mixing creates the foundation for a rich, fudgy brownie. Then, add the eggs one at a time, making sure to mix well after each addition to incorporate them fully. Finally, stir in the vanilla extract, infusing the mixture with its warm, aromatic notes.
Step 3: Introduce the Dry Elements
In a separate clean bowl, whisk together the all-purpose flour, unsweetened cocoa powder, and salt until these dry ingredients are uniformly distributed. Gradually add this dry mixture to the wet ingredients, mixing carefully until they are just combined. It is crucial to be gentle and avoid overmixing the batter, as this ensures your brownies remain tender and fudgy, not tough.
Bake to Perfection and Cool Completely
Step 4: Bake Until Just Right
Pour the prepared brownie batter evenly into the parchment-lined baking pan. Spread the batter gently from edge to edge to ensure a consistent thickness. Bake for 25-30 minutes, or until a toothpick inserted into the center comes out with moist crumbs attached, indicating they are perfectly baked but not dry. Promptly remove the brownies from the oven and allow them to cool completely in the pan on a wire rack before you even think about frosting them. This complete cooling is essential to prevent the frosting from melting.
Whipping Up the Dreamy Green Frosting
Step 5: Create Your Silky, Spring Green Frosting
While the brownies are cooling down, it’s time to prepare the star frosting. In a large bowl, beat the softened unsalted butter with an electric mixer until it becomes wonderfully light and fluffy. Gradually add the sifted powdered sugar, one cup at a time, beating continuously until the mixture is smooth and creamy. Next, incorporate 2 tablespoons of milk or heavy cream and the vanilla extract, beating until it reaches a perfectly creamy consistency. If you find the frosting is still too thick, you can add the remaining tablespoon of milk or heavy cream, one teaspoon at a time, until you achieve your desired spreadable texture. Finish by adding a few drops of green food coloring and mixing until the frosting is uniformly green, like a fresh spring meadow.
Decorate and Serve Your Festive Treats
Step 6: Assemble Your Adorable Masterpiece
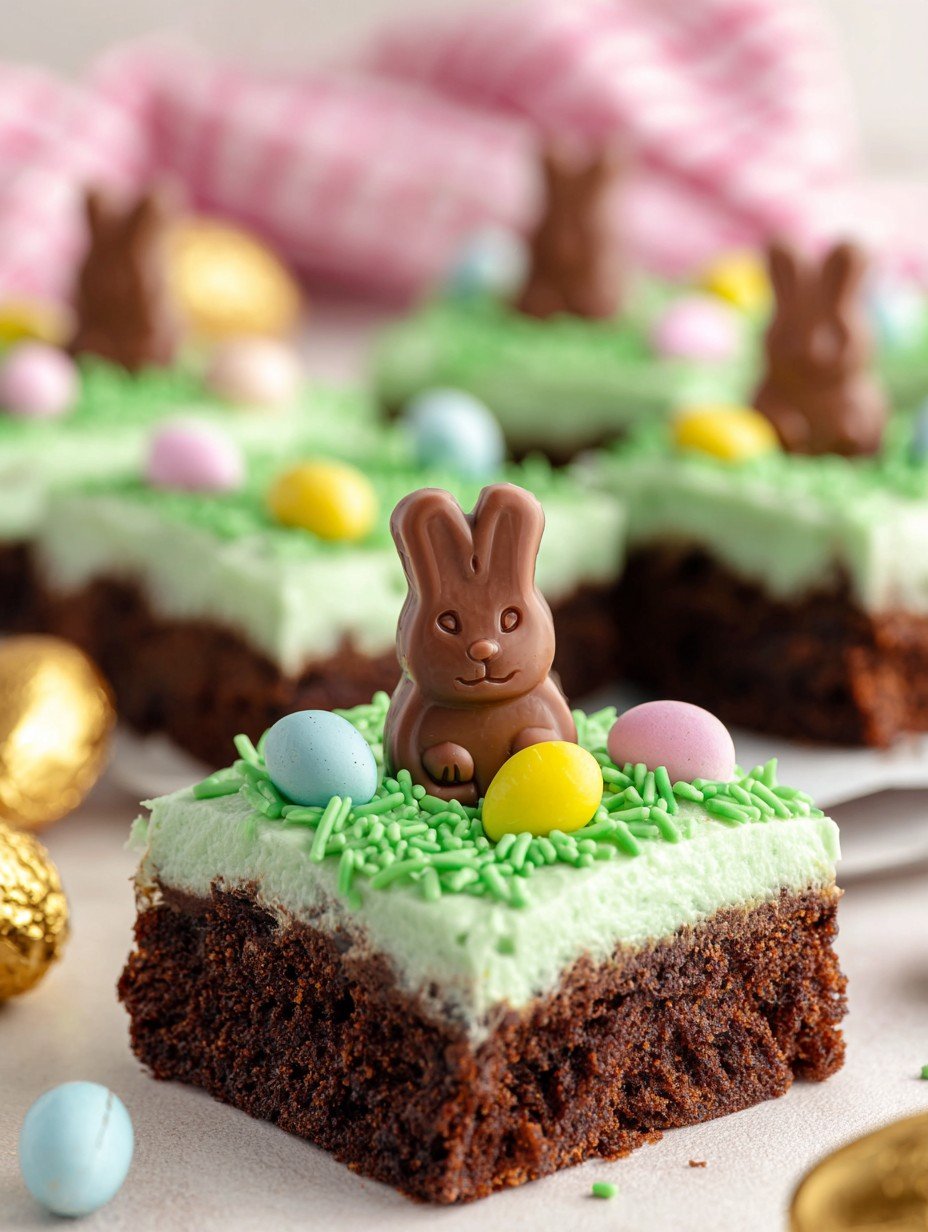
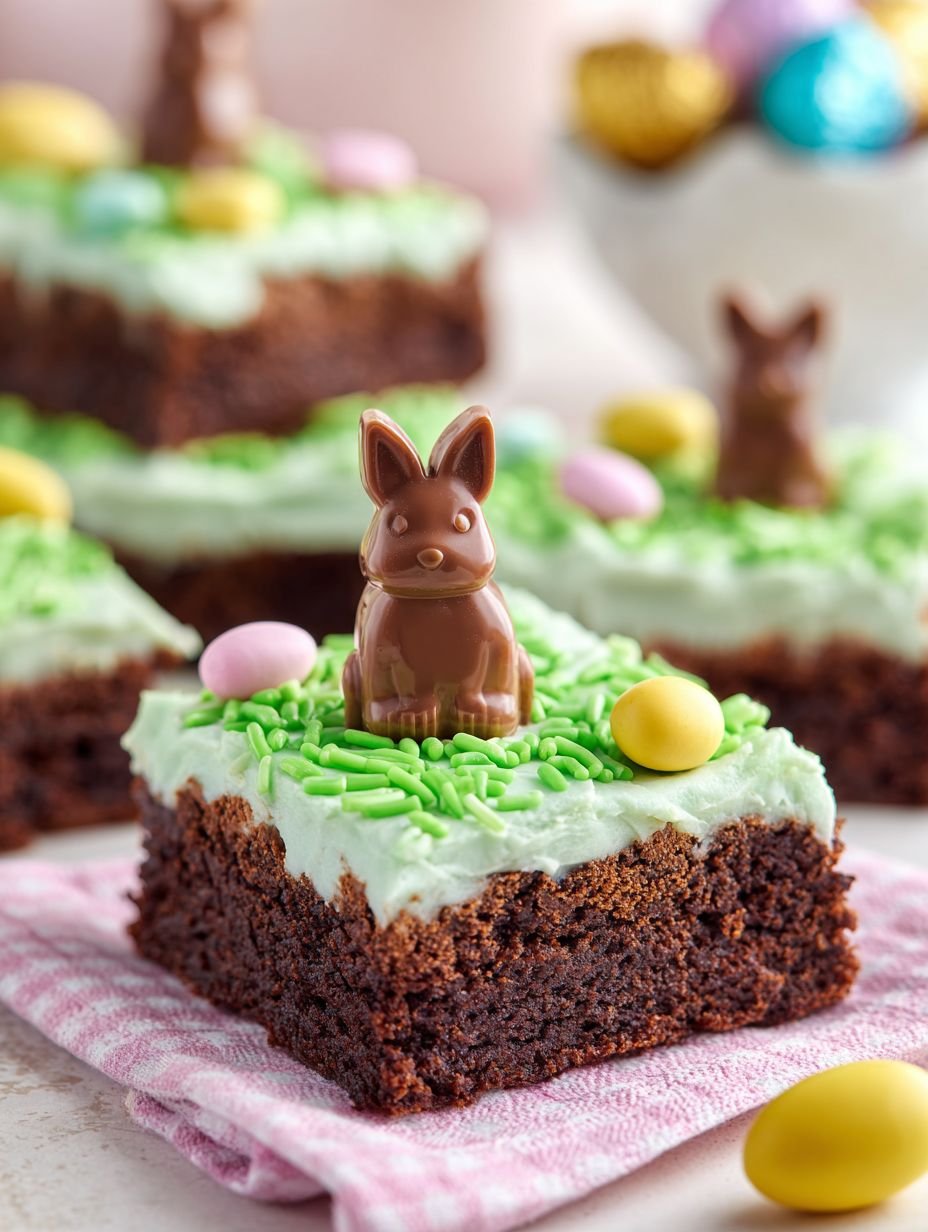
Once the brownies are completely cool to the touch, it’s time for the fun part. Carefully spread the vibrant green frosting evenly over the entire top surface of the cooled brownies. With your creative hat on, decorate the frosted brownies with a generous scattering of green sprinkles, carefully placing small candy eggs, and charming small chocolate bunny candies on each planned square. For cleaner cuts, consider chilling the frosted brownies for 30 minutes before slicing. Finally, cut into 12-16 squares before serving, ready to Celebrate Spring with Cute Easter Bunny Brownies!
Tips for Baking Perfect Brownies Every Time
Achieving that ideal fudgy brownie texture and stunning presentation for these delightful spring treats is easier than you think with a few simple pointers. Firstly, the quality of your ingredients truly shines through, especially with unsweetened cocoa powder; opt for a good brand for a deeper chocolate flavor. When mixing your brownie batter, remember the golden rule: do not overmix. Overmixing develops the gluten in the flour, which can lead to tough, cakey brownies instead of the desired dense, fudgy consistency that makes these festive squares so irresistible. Mix just until the dry ingredients are incorporated, and then stop.
Monitoring your oven is another critical step. Ovens can have hot spots, so rotating your baking pan halfway through the bake time can help ensure an even cook. The toothpick test is your best friend here; a toothpick inserted into the center should come out with moist crumbs, not wet batter. If it comes out completely clean, you’ve likely overbaked them, and nobody wants a dry brownie! Remember, brownies continue to cook slightly from residual heat after being removed from the oven.
Making and Storing Your Springtime Goodies
These delightful spring-themed brownies are not only easy to make but also incredibly convenient for planning ahead. You can certainly prepare the brownie base a day or two in advance. Simply bake them, allow them to cool completely, and then store them uncovered at room temperature or lightly covered until you are ready to frost. This allows you to spread out your baking tasks, making holiday preparations a breeze. The green frosting can also be made ahead of time and stored in an airtight container in the refrigerator for up to 3 days. Just be sure to let it come to room temperature and give it a quick whip with an electric mixer before spreading, to restore its smooth, fluffy texture.
Once your Cute Easter Bunny Brownies are fully assembled and decorated, proper storage is key to keeping them fresh and delicious. Store any leftover brownies in an airtight container at room temperature for up to 3 days. If you need them to last a bit longer, they will keep beautifully in the refrigerator for up to 5 days. For the best flavor and texture, allow refrigerated brownies to come to room temperature before serving. If you want pristine cuts and clean lines for your decorated squares, chilling the frosted brownies for about 30 minutes before slicing makes a world of difference, ensuring each adorable bunny square looks picture-perfect.
The Joy of Sharing Easter Bunny Brownies
There’s something truly special about sharing homemade treats, especially during festive seasons. These charming Easter Bunny Brownies are more than just a dessert; they are a gesture of warmth and celebration. Imagine the delight on faces, young and old, when they see the vibrant green frosting adorned with cheerful candy eggs and adorable chocolate bunnies. They are perfect for family gatherings, school parties, or simply as a thoughtful gift for neighbors and friends. Making them is an experience in itself, from the careful mixing of the rich chocolate batter to the final artistic touches of decoration. It’s an activity that can bring everyone into the kitchen, creating memories as sweet as the brownies themselves.
Why These Brownies are a Must-Bake This Spring
These brownies offer a wonderful balance of indulgent flavor and lighthearted festivity. The rich, fudgy chocolate base provides a comforting depth, while the creamy green frosting introduces a refreshing, spring-like sweetness. It’s a delightful contrast that keeps you coming back for more. The simple, straightforward instructions ensure that even novice bakers can achieve impressive results, making it accessible to all skill levels. Plus, the ability to personalize the decorations slightly, even with the provided elements, adds a touch of creative freedom. Each square is a testament to the joy of the season, making them an ideal centerpiece for your dessert table.
A Whimsical Treat to Celebrate the Season
Bringing together the deliciousness of a classic brownie with the vibrant, playful spirit of Easter, this recipe for Cute Easter Bunny Brownies truly captures the essence of spring. They are a feast for both the eyes and the palate, promising smiles with every bite. So, roll up your sleeves, gather your ingredients, and get ready to create a batch of these enchanting treats that will undoubtedly become a cherished part of your springtime traditions.
Nutritional Information
For those curious about the nutritional aspects of these delightful creations, here’s a quick overview. Each serving of these brownies provides approximately 350 calories. They contain 4g of protein, 45g of carbohydrates, and 18g of fat per serving. This makes them a wonderfully indulgent treat to enjoy in moderation as part of your festive celebrations. Embrace the joy of homemade baking and savor every moment with these delicious Easter Bunny Brownies.
Servings: 12-16
Improving the Cooking Method
For perfectly fudgy brownies, mix dry and wet ingredients just until combined; avoid overmixing. Bake 25-30 minutes, checking for moist crumbs. Crucially, cool brownies *completely* on a wire rack before applying green frosting. This sequence prevents melting, guaranteeing a beautiful, smooth finish for your lovely Easter treats.
Decorate Your Dish with Your Personal Touch
Personalize these festive brownies with your own creative touch! Swap out the green sprinkles for a medley of pastel-colored sprinkles for extra vibrancy. For the small candy eggs, consider using other small pastel chocolate eggs or even tiny sugar-dusted jellies, allowing your unique springtime vision to shine.
Smart Tips for Storage and Reheating
Maintain the delightful fudginess and creamy frosting of your Easter Bunny Brownies by storing them in an airtight container. They’ll stay fresh at room temperature for up to 3 days, or refrigerated for up to 5 days. For the best texture, always bring chilled brownies to room temperature before serving.
Practical Chef Advice
I remember one Easter, my daughter’s eyes lit up seeing these bunny brownies. She carefully selected her chocolate bunny, saving it for last. That tiny act of joy made these treats truly unforgettable.
Final Thoughts
These delightful treats are more than just a dessert; they are a celebration in every bite. With their rich, fudgy chocolate base, vibrant green frosting, and charming decorations, these brownies bring the joy of the season directly to your table. Imagine the smiles when friends and family discover these festive squares, each topped with a playful chocolate bunny and colorful candy eggs. They truly encapsulate the spirit of springtime and create memorable moments. So, gather your ingredients and get ready to create some magic. Bake a batch of these special brownies and let the cheer begin!
PrintCelebrate Spring with Cute Easter Bunny Brownies

These Easter Bunny Brownies feature a rich, fudgy chocolate brownie base, baked to a tender perfection. Each square is topped with a smooth, creamy green frosting, reminiscent of fresh spring grass. The festive presentation is completed with vibrant green sprinkles, delicate pastel candy eggs, and a charming chocolate bunny, creating a delightful treat for any Easter celebration. The combination offers a balanced sweetness and a pleasing contrast of textures.
- Prep Time: 20 minutes
- Cook Time: 25-30 minutes
- Total Time: 0 hours
- Yield: 12-16 1x
Ingredients
- For the Brownies:
- 1/2 cup (113g) unsalted butter, melted
- 1 cup (200g) granulated sugar
- 2 large eggs
- 1 teaspoon vanilla extract
- 3/4 cup (90g) all-purpose flour
- 1/2 cup (45g) unsweetened cocoa powder
- 1/4 teaspoon salt
- For the Green Frosting:
- 1/2 cup (113g) unsalted butter, softened
- 2 cups (240g) powdered sugar, sifted
- 2–3 tablespoons milk or heavy cream
- 1/2 teaspoon vanilla extract
- A few drops green food coloring
- For Decoration:
- 1/4 cup green sprinkles
- 12–16 small candy eggs
- 12–16 small chocolate bunny candies
Instructions
- Preheat your oven to 350°F (175°C). Line an 8×8 inch (20×20 cm) baking pan with parchment paper, leaving an overhang on two sides for easy removal.
- In a medium bowl, whisk together the melted butter and granulated sugar until well combined.
- Add the eggs one at a time, mixing well after each addition. Stir in the vanilla extract.
- In a separate bowl, whisk together the all-purpose flour, unsweetened cocoa powder, and salt.
- Gradually add the dry ingredients to the wet ingredients, mixing until just combined. Be careful not to overmix.
- Pour the brownie batter into the prepared baking pan and spread evenly.
- Bake for 25-30 minutes, or until a toothpick inserted into the center comes out with moist crumbs, but not wet batter. Do not overbake.
- Remove the brownies from the oven and let them cool completely in the pan on a wire rack before frosting.
- While the brownies cool, prepare the frosting: In a large bowl, beat the softened butter with an electric mixer until light and fluffy.
- Gradually add the sifted powdered sugar, one cup at a time, beating until smooth.
- Add 2 tablespoons of milk or cream and the vanilla extract. Beat until creamy. If the frosting is too thick, add the remaining tablespoon of milk or cream, one teaspoon at a time, until desired consistency is reached.
- Add a few drops of green food coloring and mix until the frosting is uniformly green.
- Once the brownies are completely cool, spread the green frosting evenly over the top.
- Decorate the frosted brownies with green sprinkles, small candy eggs, and a chocolate bunny on each square.
- Cut into 12-16 squares before serving.
Notes
Ensure brownies are completely cooled before frosting to prevent the frosting from melting.
For a fudgier brownie, avoid overmixing the batter and do not overbake.
Store leftover brownies in an airtight container at room temperature for up to 3 days, or in the refrigerator for up to 5 days.
For cleaner cuts, chill the frosted brownies for 30 minutes before slicing.
Nutrition
- Calories: 350 per serving
- Fat: 18g per serving
- Carbohydrates: 45g per serving
- Protein: 4g per serving
FAQs
How do I ensure my brownies are perfectly fudgy?
Achieving a perfectly fudgy texture for your brownies relies on a couple of key steps from the recipe. First, it is crucial not to overmix the batter once the dry ingredients have been added to the wet mixture. Overmixing can develop the gluten in the flour, leading to a tougher, cake-like texture rather than the desired fudgy consistency. Second, pay close attention to the baking time. The recipe suggests baking for 25-30 minutes, or until a toothpick inserted into the center comes out with moist crumbs, not wet batter. Removing them from the oven just before they are completely set helps maintain their moist, dense, and fudgy core.
Why is it important to cool the brownies completely before frosting?
Cooling the brownies completely before adding the green frosting is a critical step to ensure a beautiful and smooth finish. The recipe specifically notes that the brownies should be allowed to cool entirely in the pan on a wire rack. If the brownies are still warm when you apply the frosting, the heat will cause the butter in the frosting to melt. This results in a runny, messy frosting that will not set properly, making it difficult to spread evenly and ruining the festive appearance. Patience during the cooling process ensures your vibrant green “grass” frosting holds its shape perfectly.
What is the best way to store leftover brownies?
Proper storage helps maintain the freshness and delightful texture of your brownies. According to the recipe notes, leftover brownies should be stored in an airtight container. If you plan to enjoy them within three days, keeping them at room temperature is suitable. For extended freshness, especially if you anticipate having them for longer, you can store the brownies in the refrigerator for up to five days. This method helps keep the fudgy base moist and the creamy frosting intact, ready for when you crave another sweet bite.
How can I achieve clean cuts when serving the frosted brownies?
For neat and tidy squares, the recipe offers a helpful tip: chill the frosted brownies before slicing them. After you have spread the green frosting evenly and added all the cheerful decorations, place the entire pan in the refrigerator for approximately 30 minutes. This chilling period allows both the brownie base and the creamy frosting to firm up. Once chilled, using a sharp knife that has been run under hot water and wiped clean between each cut will help you achieve wonderfully clean and precise squares, ready for serving your guests.