
Imagine a burst of rich chocolate cookie, followed by the creamy tang of softened cheese, all enrobed in a velvety smooth layer of sweet white chocolate. Each bite offers a delightful textural dance, a treat that’s as charming to look at as it is delicious to devour.
I remember one frantic Easter morning, realizing I’d forgotten dessert for the family brunch. With a house full of hungry relatives and zero baking motivation, a flash of inspiration hit me, saving the day with a batch of whimsical, no-fuss treats.
Why You’ll Love This Recipe
You’re about to discover a dessert that effortlessly combines ease with undeniable charm. This recipe for delightful bunny treats requires absolutely no baking, making it perfect for busy schedules or budding chefs who shy away from ovens. Beyond the simple preparation, these creamy chocolate cookie spheres offer a unique flavor profile, blending the classic taste of chocolate sandwich cookies with a luscious cream cheese filling, all wrapped in a sweet white chocolate shell. Their stunning appearance, complete with adorable pink ears and expressive chocolate eyes, guarantees they’ll be the star of any spread, from birthday parties to holiday gatherings. Plus, these versatile treats are wonderfully customizable; while we’re making charming bunnies today, the base recipe is a canvas for endless creative decorating possibilities.
Ingredients
Here’s what you need for this delicious dish:
- **1 (14.3 oz) package Oreo cookies (about 36 cookies)** Our foundational flavor hero! These iconic chocolate sandwich cookies provide the rich, dark chocolate base and crumbly texture that makes these adorable bunny treats so irresistible. Ensure you have the classic variety for that signature taste.
- **8 oz cream cheese, softened** The secret to their incredible creaminess and delightful tang. This ingredient binds the cookie crumbs into a pliable dough and adds a luscious richness. Remember to bring it to room temperature for effortless, lump-free mixing.
- **16 oz white chocolate melting wafers or good quality white chocolate chips** The smooth, sweet coating that transforms our simple cookie balls into elegant, bunny-white canvases. Melting wafers are often easier to work with for a consistent, glossy finish, but good quality chips will also do the trick.
- **1/2 cup white sprinkles or shredded coconut** These are the key to achieving that irresistibly fluffy, cottontail texture, making your adorable bunny creations truly come to life. Choose whichever you prefer for the desired finish.
- **Pink candy melts or fondant for ears** These vibrant little details are what give our delicious desserts their signature bunny charm, transforming simple spheres into recognizable characters. Candy melts offer ease, while fondant allows for more intricate shaping if desired.
- **Mini chocolate chips or chocolate sprinkles for eyes and nose** The crucial elements for adding character and expression to your adorable bunny treats. Mini chocolate chips provide distinct features, while sprinkles offer a more delicate touch.
The complete ingredient list, including quantities, can be found directly under the recipe card.
Step-by-Step Instructions
Follow these simple steps to prepare this delicious dish:
Step 1: Crushing the Cookies
Place your package of Oreo cookies into a food processor and pulse until they are finely crushed into uniform crumbs. If you don’t have a food processor, no worries! You can achieve the same result by placing the cookies in a large zip-top bag and crushing them thoroughly with a rolling pin until fine.
Step 2: Mixing the Dough
Transfer the finely crushed Oreo crumbs into a large bowl. Add the softened cream cheese to the bowl. Using a sturdy spoon or clean hands, mix these two ingredients thoroughly until they are completely combined and form a consistent, dough-like mixture. Ensure there are no streaks of cream cheese left.
Step 3: Forming the Balls
Take small portions of the cookie mixture and roll them into uniform 1-inch balls. As you form each ball, place it onto a baking sheet that has been lined with parchment paper. This parchment paper will prevent sticking and make the next steps much smoother.
Step 4: Chilling for Firmness
Once all the balls are formed and on the parchment-lined sheet, refrigerate them for at least 30 minutes. Alternatively, if you’re in a bit of a rush, you can place them in the freezer for about 15 minutes. This chilling step is crucial to ensure the cookie balls are firm enough for dipping.
Step 5: Preparing the Bunny Ears
While your delicious cookie balls are chilling, it’s time to craft those iconic bunny ears. If using pink candy melts, melt a small amount according to the package directions until smooth. If opting for pink fondant, roll it out very thinly on a clean surface. Cut out small, oval shapes that will serve as the ears. Allow these ear shapes to set completely before proceeding.
Step 6: Melting the White Chocolate
Take your white chocolate melting wafers or good quality white chocolate chips and place them in a microwave-safe bowl. Heat the chocolate in 30-second intervals, stirring thoroughly after each interval, until the chocolate is completely smooth and free of any lumps. For an extra smooth coating, consider adding 1 teaspoon of coconut oil or shortening to the white chocolate while melting.
Step 7: Dipping the Balls
Carefully take each chilled cookie ball and dip it completely into the melted white chocolate, ensuring it is fully coated. Gently tap the ball against the side of the bowl or use a dipping tool to remove any excess chocolate. This ensures a clean, even coating for your delightful treats.
Step 8: Decorating with Features
Immediately after dipping, place the white chocolate-coated ball back onto the parchment-lined baking sheet. While the chocolate coating is still wet, gently press two of your prepared pink ears into the top of the ball. Then, add two mini chocolate chips for the eyes and one for the nose, positioning them carefully to create an adorable bunny face.
Step 9: Adding Fluffy Texture (Optional)
If you desire that wonderfully fluffy texture for your charming bunny treats, gently roll the wet chocolate-coated ball in the white sprinkles or shredded coconut immediately after dipping and before adding the facial features. This creates a lovely, soft finish that enhances the adorable appearance.
Step 10: Final Chill and Set
Return all your beautifully decorated treats to the refrigerator for at least 1 hour, or until the white chocolate coating is completely set and firm to the touch. This final chill ensures everything holds together perfectly. Store any leftover bunny spheres in an airtight container in the refrigerator for up to one week for continued enjoyment.
Crafting Perfect No-Bake Wonders
Creating these charming bunny-shaped treats is truly a joyful experience, and with a few insider tips, you can ensure every single one is picture-perfect. The key to the creamy, lump-free center of these adorable Oreo balls truly lies in using softened cream cheese. When it’s at room temperature, it blends seamlessly with the crushed chocolate cookies, creating a smooth, workable dough that’s a dream to roll. If, by chance, your dough feels a little too sticky while you’re shaping the 1-inch balls, don’t fret! Simply pop it back into the refrigerator for a brief chill. A quick 10 to 15 minutes can make all the difference, firming it up just enough to handle without any sticky situations.
When it comes to dipping these delightful spheres, precision makes a huge impact. A toothpick or a specialized dipping tool can be your best friend here, allowing you to submerge each ball fully in the melted white chocolate without getting your fingers messy. It also helps to achieve an even coating and lets you tap off any excess chocolate efficiently, preventing puddles on your parchment paper. These little no-bake wonders are more than just a dessert; they’re a statement of simple elegance and pure fun.
Beyond the Bunny: Customization and Celebration
While our focus today is on crafting these delightful no-bake bunny creations, the underlying recipe is incredibly versatile. Once you master the basic chocolate cookie ball, you’ll find endless opportunities to adapt them for any occasion. Imagine rolling them in green sprinkles for St. Patrick’s Day, vibrant rainbow sprinkles for a birthday party, or even simply dipping them in milk chocolate for a different flavor profile. The beauty of these creamy chocolate cookie balls is their ability to transform with just a change of decoration. They’re a fantastic project for involving little helpers in the kitchen too. Kids love crushing cookies and rolling dough, making this a wonderful family activity that results in delicious memories and even tastier treats. The minimal mess and no-bake aspect make cleanup a breeze, leaving more time for enjoying your sweet creations.
These charming spheres are not just desserts; they are conversation starters, eye-catching centerpieces, and bite-sized packets of joy. Whether you’re making them for a holiday brunch, a school bake sale, or simply as a fun weekend activity, these adorable cookie balls promise smiles and satisfied cravings. Their convenient no-bake preparation means you can whip up a batch without the stress of oven timers or cooling racks, offering a relaxing culinary escape that delivers impressive results every time.
Nutritional Snapshot and Servings
For those curious about the specifics, each of these scrumptious, white chocolate-coated spheres offers a delightful balance. You can expect approximately 24 balls from this recipe, making them perfect for sharing or stocking up for a week of sweet cravings.
Here’s a quick glance at the nutritional information per serving, which is based on one delightful ball:
- Calories: 180 kcal
- Protein: 2g
- Carbs: 22g
- Fat: 10g
These figures reflect the rich, satisfying nature of these decadent little treats. They are perfect for enjoying in moderation or as a special indulgence. Remember, storing these in an airtight container in the refrigerator will keep them fresh and delicious for up to seven days, though honestly, they rarely last that long in my house! Enjoy every creamy, chocolatey bite of these truly adorable bunny-shaped desserts.
Perfecting the Cooking Process
For flawless results, prioritize chilling your rolled Oreo balls thoroughly. While they firm up, you can efficiently prepare the pink ears and melt the white chocolate. This seamless flow ensures your white chocolate coating is applied to perfectly firm centers, preventing messy dips and ensuring these adorable bunny treats hold their shape beautifully.
Add Your Personal Touch
Feel free to personalize these delightful no-bake bunny desserts! Instead of classic Oreos, experiment with different flavored Oreo cookies for a unique center. Swap the white sprinkles for pastel-colored ones to match a party theme, or use finely shredded coconut for a softer, fluffier texture on your bunny-shaped treats. You can even try different colored candy melts for the ears!
Storage & Reheating
Store leftover Adorable Bunny Oreo Balls in an airtight container in the refrigerator for up to one week. To maintain the crispness of the white sprinkles or the delicate fluffiness of shredded coconut, ensure the container is tightly sealed. This keeps your easy no-bake recipe creations perfectly delightful with a creamy center and firm coating.
Helpful Chef Tips
One Easter, my niece, covered in pink candy melts and chocolate chips, declared these easy no-bake bunny desserts “the best ever!” Her joy watching these adorable creations come to life made every single sprinkle worth it.
Final Thoughts
There’s something truly special about creating a treat that brings so much joy with so little effort. These charming bunny cookie delights offer that perfect blend of creamy texture and sweet flavor. They are completely no-bake. Imagine the smiles when these adorable confections appear on your table! Each one is a tiny work of edible art. Their delightful appearance makes them ideal for any celebration. They also brighten a quiet afternoon. Don’t wait to experience the magic. Gather your ingredients and start creating your own beautiful batch today. You’ll be amazed at the simple, delightful result.
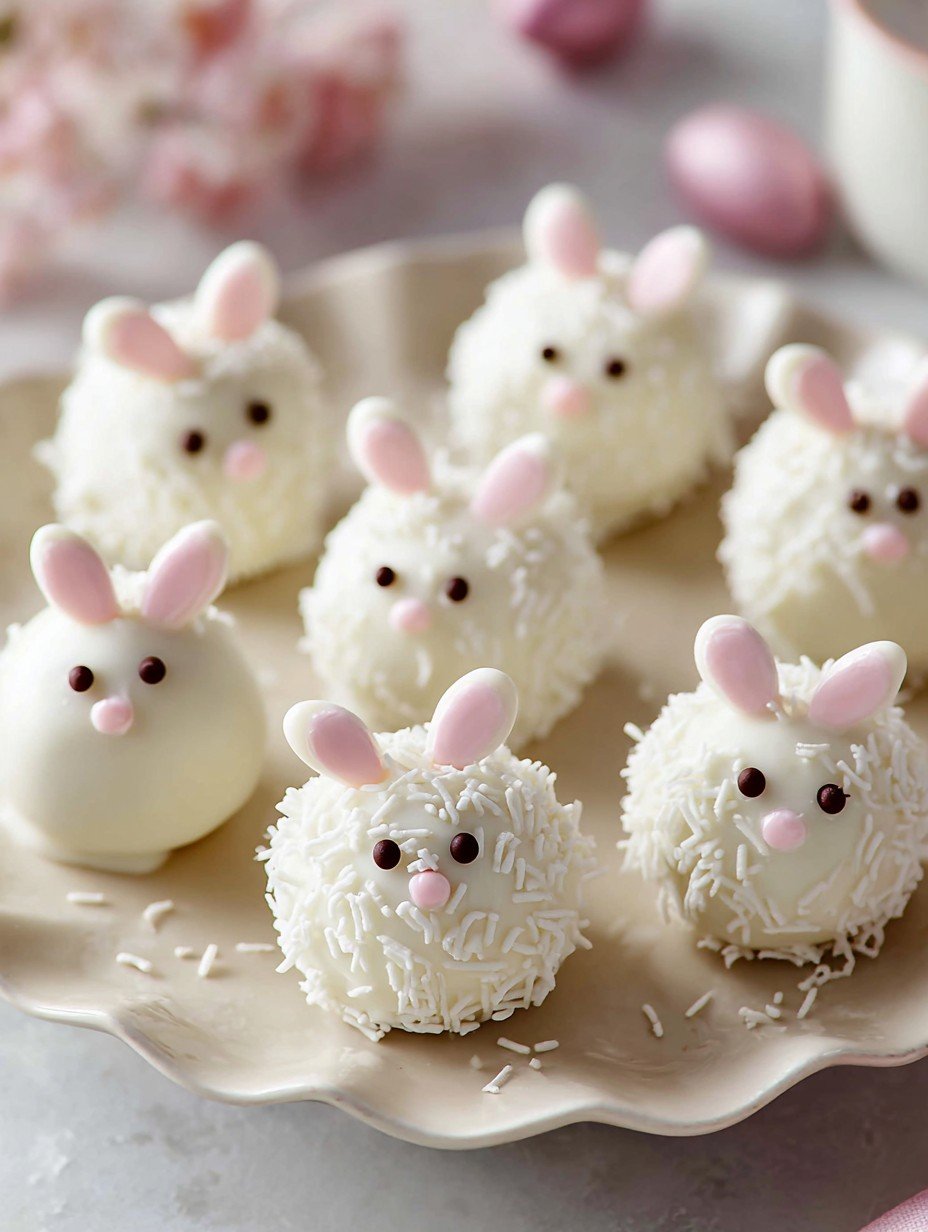
PrintAdorable Bunny Oreo Balls: Easy No-Bake Recipe

These delightful no-bake treats feature a rich, creamy chocolate cookie center, enrobed in a smooth layer of white chocolate. Each ball is then adorned with delicate pink ears, charming chocolate chip eyes, and a small chocolate nose, creating an adorable bunny appearance. A coating of fine white sprinkles or shredded coconut adds a subtle textural contrast and a fluffy finish. They offer a harmonious blend of sweet chocolate and creamy tang, making them a festive and appealing dessert.
- Prep Time: 45 minutes
- Cook Time: 0 minutes (plus 2 hours chilling)
- Total Time: 45 minutes
- Yield: 24 balls 1x
Ingredients
- 1 (14.3 oz) package Oreo cookies (about 36 cookies)
- 8 oz cream cheese, softened
- 16 oz white chocolate melting wafers or good quality white chocolate chips
- 1/2 cup white sprinkles or shredded coconut
- Pink candy melts or fondant for ears
- Mini chocolate chips or chocolate sprinkles for eyes and nose
Instructions
- Place Oreo cookies in a food processor and pulse until finely crushed into crumbs. Alternatively, place cookies in a large zip-top bag and crush with a rolling pin.
- In a large bowl, combine the crushed Oreo crumbs and softened cream cheese. Mix thoroughly until well combined and a dough-like consistency is formed.
- Roll the mixture into 1-inch balls and place them on a parchment-lined baking sheet.
- Refrigerate the balls for at least 30 minutes, or freeze for 15 minutes, until firm.
- While the balls are chilling, prepare the bunny ears. Melt a small amount of pink candy melts according to package directions, or roll out pink fondant very thinly. Cut out small oval shapes for the ears. Allow them to set.
- Melt the white chocolate melting wafers in a microwave-safe bowl in 30-second intervals, stirring after each, until smooth.
- Dip each chilled Oreo ball into the melted white chocolate, ensuring it is fully coated. Tap gently to remove excess chocolate.
- Immediately place the dipped ball onto the parchment-lined baking sheet. While the chocolate is still wet, gently press two pink ears into the top of the ball. Add two mini chocolate chips for eyes and one for the nose.
- If desired, roll the wet chocolate-coated ball in white sprinkles or shredded coconut for a fluffy texture before adding the facial features.
- Return the decorated balls to the refrigerator for at least 1 hour, or until the chocolate coating is completely set.
Notes
For extra smooth white chocolate, add 1 teaspoon of coconut oil or shortening when melting.
Ensure cream cheese is at room temperature for easier mixing.
If the dough becomes too sticky while rolling, chill it briefly.
Use a toothpick or a dipping tool for easier coating of the balls.
Store leftover bunny balls in an airtight container in the refrigerator for up to one week.
Nutrition
- Calories: 180 kcal
- Fat: 10g
- Carbohydrates: 22g
- Protein: 2g
FAQs
Why is chilling the Oreo balls important?
Chilling is a crucial step for these no-bake treats. After rolling the Oreo and cream cheese mixture into balls, they need to be refrigerated for at least 30 minutes, or frozen for 15 minutes, until they are firm. This firmness prevents the balls from falling apart when you dip them into the melted white chocolate. It also helps the white chocolate coating adhere smoothly and set quickly. The final chill after decoration, for at least 1 hour, ensures the white chocolate is completely set and your delicate bunny decorations are securely in place before serving.
How can I ensure my white chocolate coating is smooth?
Achieving a silky-smooth white chocolate coating is key for these delightful treats. When melting the white chocolate wafers or chips, use a microwave-safe bowl and heat them in 30-second intervals, stirring thoroughly after each interval. This gradual melting prevents scorching and ensures an even consistency. For an even smoother finish, the recipe notes suggest adding 1 teaspoon of coconut oil or shortening to the white chocolate while melting. This addition helps create a more fluid texture, making dipping easier and resulting in a perfectly glossy, uniform coating for your bunny-shaped desserts.
What if my Oreo and cream cheese mixture is too sticky to roll?
If you find the Oreo and cream cheese mixture becoming too sticky to handle easily while you are rolling the 1-inch balls, don’t worry! This can sometimes happen, especially if your cream cheese was very soft or the kitchen is warm. The solution is simple: just return the mixture to the refrigerator for a brief period. A quick chill will help firm up the dough-like consistency, making it much easier to roll into perfect, uniform spheres. This brief refrigeration will allow you to continue creating your adorable bunny treats without any fuss.
How should I store leftover Adorable Bunny Oreo Balls?
To keep any leftover Adorable Bunny Oreo Balls fresh and delicious, proper storage is essential. They should be stored in an airtight container to prevent them from drying out or absorbing other flavors from the refrigerator. Place them gently inside the container, perhaps with parchment paper between layers if stacking, to protect their delicate decorations. Kept in the refrigerator, these treats will maintain their quality and delightful taste for up to one week. Enjoy them chilled for the best experience.