Picture sinking your fork into velvety, cocoa-kissed cake layers, each bite bursting with sweet strawberries and enrobed in a cloud of tangy cream cheese frosting. Pure bliss, truly. I once tried a “healthier” version for a friend’s birthday, involving avocado and a dream. The cake was green, dense, and tasted like regret. This recipe is your delicious antidote, a reminder that some classics are perfect as they are.
Now, let’s talk about the magic that happens when you bring together the rich, subtle cocoa of a red velvet cake with the bright, undeniable sweetness of fresh strawberries. It is a culinary match made in heaven, a symphony of textures and flavors that will undoubtedly become Your New Obsession: Strawberry Red Velvet Cake. This is not just another dessert recipe; it is an invitation to create something truly special, something that will have everyone asking for seconds (and the recipe!). Whether you are a seasoned baker or just starting your journey into the world of layered cakes, this particular creation offers a delightful challenge with immensely rewarding results. Forget those complicated, finicky recipes that leave you stressed and covered in flour. We are here for joyful baking, for the kind of kitchen experience that leaves you with a stunning dessert and a smile on your face.
Why You’ll Love This Recipe
This elegant Red Velvet Strawberry Layer Cake is not just a dessert; it is an experience! Its straightforward preparation defies its stunning, professional appearance, making you look like a pastry wizard. The unique flavor profile, blending subtle cocoa with vibrant, fresh strawberries and a rich, tangy cream cheese frosting, offers a sophisticated palate pleaser. Plus, it is incredibly versatile; whether celebrating or simply treating yourself, this cake always hits the sweet spot.
Ingredients
Here’s what you need for this delicious dish:
The complete ingredient list, including quantities, can be found directly under the recipe card.
Step-by-Step Instructions
Follow these simple steps to prepare this delicious dish:
**Step 1: Crafting the Velvety Cake Layers**
Begin by preheating your oven to 350°F (175°C), then prepare two 8-inch round cake pans by greasing and flouring them, or lining them neatly with parchment paper. In a spacious bowl, whisk together the dry ingredients: all-purpose flour, granulated sugar, baking soda, salt, and the unsweetened cocoa powder. In a separate, medium-sized bowl, combine the wet ingredients: buttermilk, vegetable oil, large eggs, vanilla extract, a generous tablespoon of red food coloring (gel is your best friend here for that vibrant hue), and the white vinegar. Whisk these until they are perfectly combined. Now, slowly incorporate the wet mixture into the dry ingredients, using an electric mixer on low speed. Mix until just combined; resist the urge to overmix, as that leads to a tough cake! Divide your beautiful batter evenly between your prepared pans. Bake for 25-30 minutes, or until a wooden skewer poked into the center emerges clean. Allow the cakes to cool in their pans for 10-15 minutes before carefully inverting them onto a wire rack to cool completely. Patience is key here for perfect layers!
**Step 2: Whipping Up the Tangy Cream Cheese Frosting**
While your cake layers are cooling, let us tackle that divine cream cheese frosting. In a large bowl, grab your electric mixer and beat the softened full-fat cream cheese and softened unsalted butter together on medium speed for about 2-3 minutes, until the mixture is wonderfully smooth and creamy. Next, gradually add the sifted powdered sugar, one cup at a time. Start on low speed until it is incorporated, then bump up the speed to medium and beat until the frosting is delightfully light and fluffy. Finish by beating in the vanilla extract. If you are aiming for a lighter, airier frosting, now is the time to add the optional heavy cream and beat just until it reaches your desired consistency. Be careful not to overbeat, or it could separate.
**Step 3: Preparing the Sweet Strawberry Star**
Now for the juicy stars of this show: the fresh strawberries. Hull and slice your 2 lbs of fresh strawberries. If you like, for an extra burst of sweetness and to release some of their natural juices, gently toss the sliced strawberries with 2 tablespoons of granulated sugar. Let them sit for about 10-15 minutes. Before you start assembling, remember to drain any excess liquid to prevent your cake from becoming soggy. Reserve some whole, perfect strawberries for a stunning topping later.
**Step 4: Assembling Your Masterpiece**
Once your cake layers are completely cool (this is non-negotiable for a perfect finish!), use a serrated knife to level the tops if they have domed. Place one cake layer on your chosen serving plate or cake stand. Spread a generous, even layer of your creamy dream cheese frosting over the top. Now, arrange a beautiful layer of your prepared sliced strawberries over the frosting, leaving a small border around the edge for neatness. Carefully place the second cake layer on top. Repeat the process: another generous layer of frosting, followed by more luscious sliced strawberries. Finally, place the third cake layer on top. At this point, apply a thin “crumb coat” of frosting over the entire cake – sides and top – to seal in any rogue crumbs. Chill the cake in the refrigerator for a quick 15-20 minutes to set this crumb coat.
**Step 5: The Grand Finale and Garnish**
After the crumb coat has set, take your cake out of the fridge. Apply the remaining cream cheese frosting to the top and sides, smoothing it out with an offset spatula or bench scraper until it looks picture-perfect. For the final flourish, artfully arrange your reserved whole fresh strawberries on top of the cake. These add both beauty and another burst of fresh fruitiness. Chill the entire assembled cake for at least 30 minutes before you proudly slice and serve. This chilling step ensures the cake is firm and easy to cut, letting you savor every single, glorious piece. Enjoy Your New Obsession: Strawberry Red Velvet Cake!
—
DESCRIPTION:
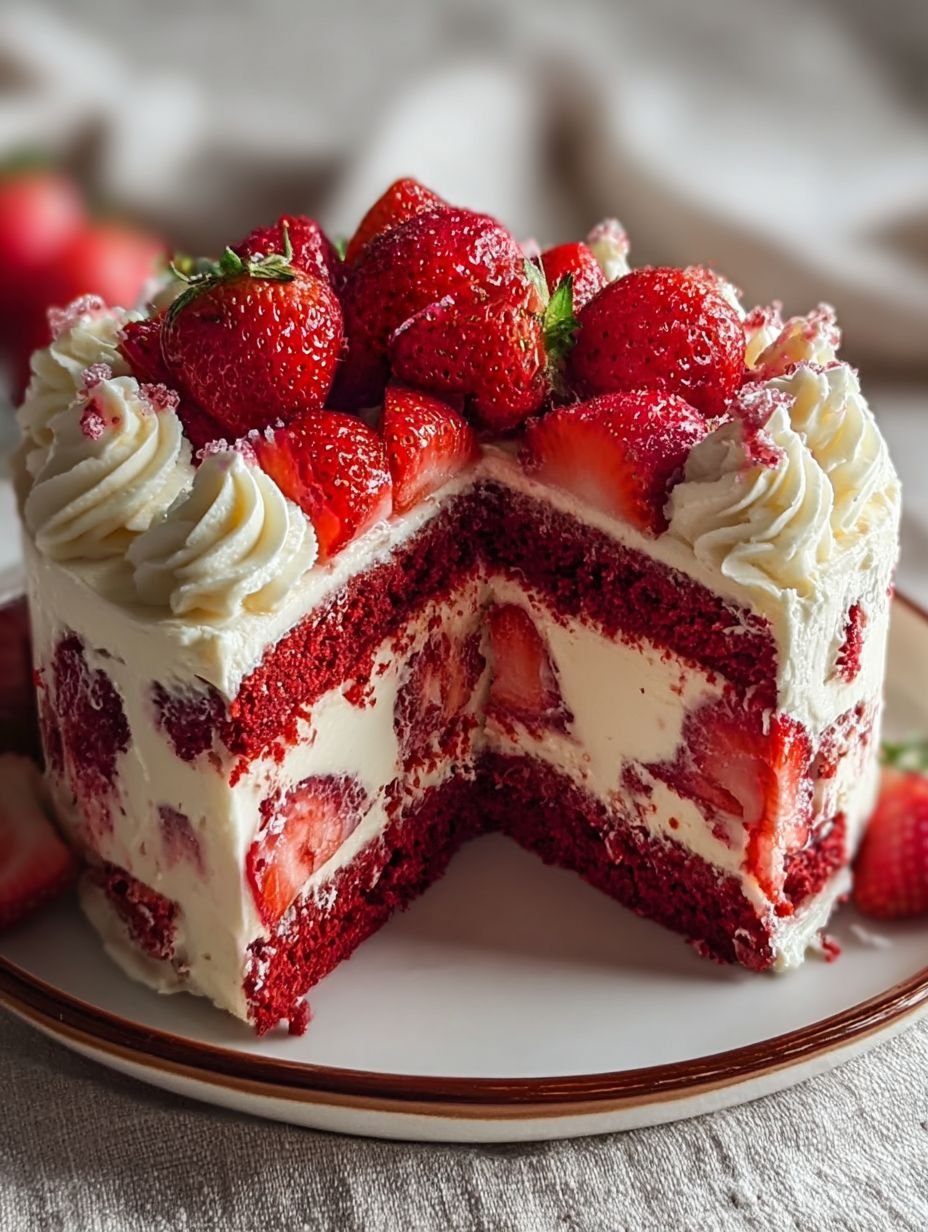
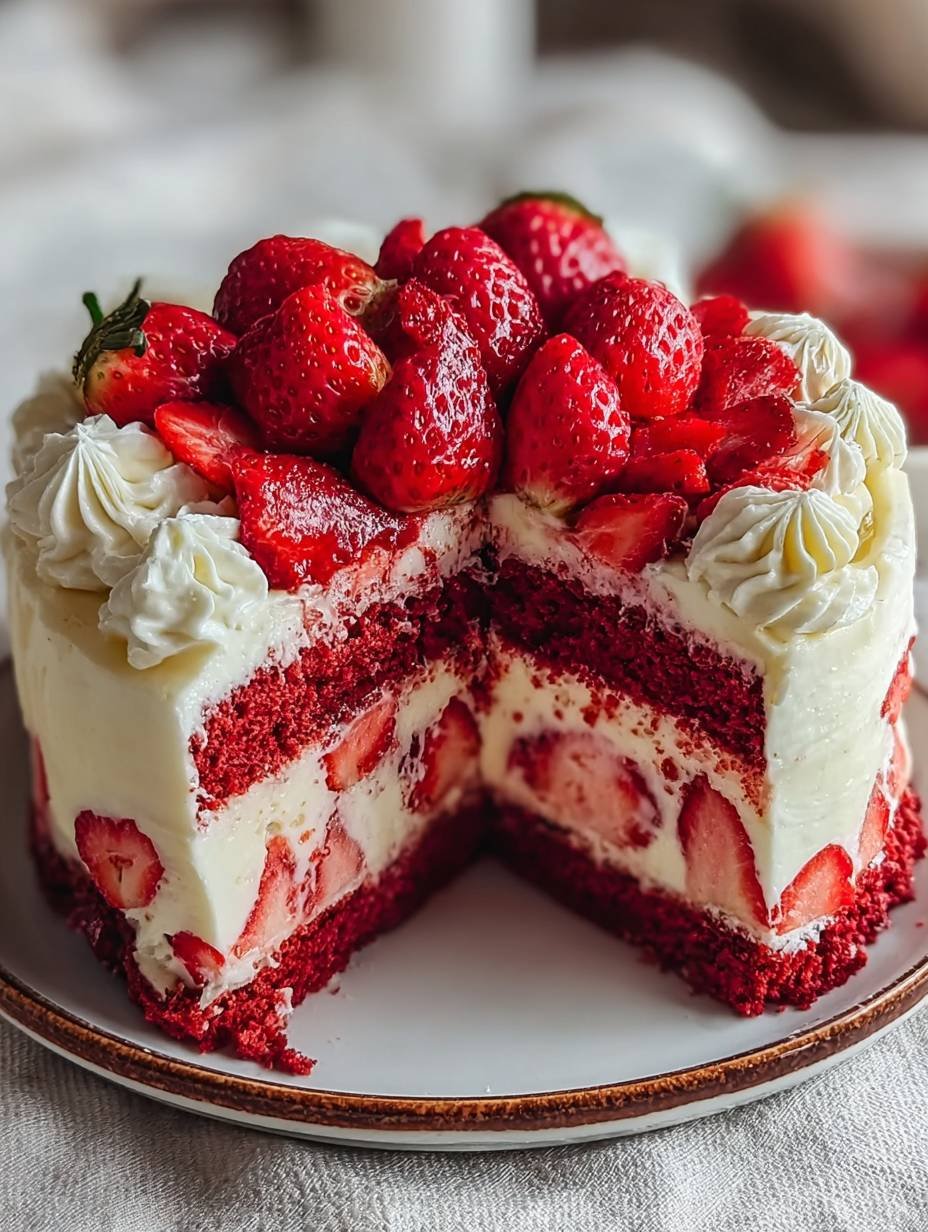
This elegant Red Velvet Strawberry Layer Cake features moist, tender red velvet cake layers with a subtle cocoa flavor, beautifully contrasted by a rich, tangy cream cheese frosting. Each layer is generously studded with fresh, sweet strawberries, adding a delightful burst of fruitiness and a vibrant texture. The cake is finished with a smooth exterior of cream cheese frosting and crowned with an abundance of whole fresh strawberries, creating a visually stunning and deliciously balanced dessert.
INGREDIENTS:
For the Red Velvet Cake:
2 ½ cups all-purpose flour
1 ½ cups granulated sugar
1 teaspoon baking soda
1 teaspoon salt
1 tablespoon unsweetened cocoa powder
1 cup buttermilk, room temperature
1 cup vegetable oil
2 large eggs, room temperature
1 teaspoon vanilla extract
1 tablespoon red food coloring (gel preferred)
1 teaspoon white vinegar
For the Cream Cheese Frosting:
16 ounces (2 blocks) full-fat cream cheese, softened
1 cup (2 sticks) unsalted butter, softened
4-5 cups powdered sugar, sifted
2 teaspoons vanilla extract
¼ cup heavy cream (optional, for lighter frosting)
For the Strawberry Filling and Topping:
2 lbs fresh strawberries, hulled and sliced (reserve some whole for topping)
2 tablespoons granulated sugar (optional, for macerating strawberries)
INSTRUCTIONS:
1. Prepare the Red Velvet Cake Layers:
2. Preheat your oven to 350°F (175°C). Grease and flour two 8-inch round cake pans, or line with parchment paper.
3. In a large bowl, whisk together the flour, granulated sugar, baking soda, salt, and cocoa powder.
4. In a separate medium bowl, whisk together the buttermilk, vegetable oil, eggs, vanilla extract, red food coloring, and white vinegar until well combined.
5. Gradually add the wet ingredients to the dry ingredients, mixing on low speed with an electric mixer until just combined. Do not overmix.
6. Divide the batter evenly between the prepared cake pans.
7. Bake for 25-30 minutes, or until a wooden skewer inserted into the center comes out clean.
8. Let the cakes cool in the pans for 10-15 minutes before inverting them onto a wire rack to cool completely.
9. Prepare the Cream Cheese Frosting:
10. In a large bowl, using an electric mixer, beat the softened cream cheese and softened butter together on medium speed until smooth and creamy, about 2-3 minutes.
11. Gradually add the sifted powdered sugar, one cup at a time, mixing on low speed until incorporated, then increase speed to medium and beat until light and fluffy.
12. Beat in the vanilla extract. If using, add the heavy cream and beat until the frosting is light and airy. Be careful not to overbeat.
13. Prepare the Strawberries:
14. If desired, gently toss the sliced strawberries with 2 tablespoons of granulated sugar and let them sit for 10-15 minutes to release some juices. Drain any excess liquid before assembling.
15. Assemble the Cake:
16. Once the cake layers are completely cool, use a serrated knife to level the tops of the cakes if necessary.
17. Place one cake layer on your serving plate or cake stand. Spread a generous layer of cream cheese frosting over the top.
18. Arrange a layer of sliced strawberries over the frosting, leaving a small border around the edge.
19. Carefully place the second cake layer on top. Spread another generous layer of frosting, then arrange more sliced strawberries.
20. Place the third cake layer on top. Apply a thin crumb coat of frosting over the entire cake to seal in any loose crumbs. Chill the cake in the refrigerator for 15-20 minutes.
21. Once chilled, apply the remaining cream cheese frosting to the top and sides of the cake, smoothing it with an offset spatula or bench scraper.
22. Decorate the top of the cake with the reserved whole fresh strawberries.
23. Chill the cake for at least 30 minutes before slicing and serving.
DETAILS:
Servings: 10-12
NUTRITION:
Calories: 550-650 per serving
Protein: 6-8g per serving
Carbs: 70-85g per serving
Fat: 30-40g per serving
NOTES:
Ensure all dairy ingredients (buttermilk, cream cheese, butter, eggs) are at room temperature for a smooth, lump-free batter and frosting.
Do not overmix the cake batter; overmixing can lead to a tough cake. Mix until just combined.
For the most vibrant red color, use a high-quality gel food coloring.
Chill the cake layers completely before frosting to prevent the frosting from melting or sliding.
Store the finished cake in an airtight container in the refrigerator for up to 3-4 days.
Mastering the Secrets of Cooking
Achieve red velvet perfection by ensuring dairy and eggs are room temperature first. Preheat your oven. Bake cake layers thoroughly, then cool them *completely*. Crucially, chill those cooled layers *before* frosting. Don’t skip the crumb coat and second chill for ultimate stability and a flawless finish.
Make Your Recipe Unique
To personalize, swap fresh strawberries for vibrant raspberries or sweet blueberries. For a denser cream cheese frosting, simply omit the optional heavy cream. You can also adjust the red food coloring for your ideal vibrant hue. Get creative with this delicious recipe!
Smart Storage & Reheating
Store your Strawberry Red Velvet Cake in an airtight container in the refrigerator for up to 3-4 days. This is key to maintaining the cake’s moist crumb and the frosting’s creamy texture. For optimal flavor and softer frosting, let individual slices warm at room temperature for 15 minutes before serving.
The Chef’s Golden Tips
The first time I shared this cake, my friends gasped, “It’s stunning!” Their pure joy tasting its vibrant layers and fresh berries made it an instant, unforgettable classic for us all.
Final Thoughts
Bringing this vibrant creation to life is a truly rewarding experience, culminating in a dessert that’s as stunning to behold as it is delightful to taste. The interplay of tender, cocoa-kissed layers, the lush tang of cream cheese frosting, and the sweet burst of fresh strawberries creates an unforgettable symphony of flavors and textures. This isn’t just a cake; it’s a celebration on a plate. If you’ve been searching for that show-stopping dessert that will impress everyone, then making this delightful strawberry red velvet cake is exactly what you need. Dive in and discover why it just might become your new obsession.
PrintYour New Obsession: Strawberry Red Velvet Cake

This elegant Red Velvet Strawberry Layer Cake features moist, tender red velvet cake layers with a subtle cocoa flavor, beautifully contrasted by a rich, tangy cream cheese frosting. Each layer is generously studded with fresh, sweet strawberries, adding a delightful burst of fruitiness and a vibrant texture. The cake is finished with a smooth exterior of cream cheese frosting and crowned with an abundance of whole fresh strawberries, creating a visually stunning and deliciously balanced dessert.
- Prep Time: 60 minutes
- Cook Time: 30 minutes
- Total Time: 1 hour 30 minutes
- Yield: 10-12 1x
Ingredients
- **For the Red Velvet Cake:**
- 2 ½ cups all-purpose flour
- 1 ½ cups granulated sugar
- 1 teaspoon baking soda
- 1 teaspoon salt
- 1 tablespoon unsweetened cocoa powder
- 1 cup buttermilk, room temperature
- 1 cup vegetable oil
- 2 large eggs, room temperature
- 1 teaspoon vanilla extract
- 1 tablespoon red food coloring (gel preferred)
- 1 teaspoon white vinegar
- **For the Cream Cheese Frosting:**
- 16 ounces (2 blocks) full-fat cream cheese, softened
- 1 cup (2 sticks) unsalted butter, softened
- 4–5 cups powdered sugar, sifted
- 2 teaspoons vanilla extract
- ¼ cup heavy cream (optional, for lighter frosting)
- **For the Strawberry Filling and Topping:**
- 2 lbs fresh strawberries, hulled and sliced (reserve some whole for topping)
- 2 tablespoons granulated sugar (optional, for macerating strawberries)
Instructions
- **Prepare the Red Velvet Cake Layers:**
- Preheat your oven to 350°F (175°C). Grease and flour two 8-inch round cake pans, or line with parchment paper.
- In a large bowl, whisk together the flour, granulated sugar, baking soda, salt, and cocoa powder.
- In a separate medium bowl, whisk together the buttermilk, vegetable oil, eggs, vanilla extract, red food coloring, and white vinegar until well combined.
- Gradually add the wet ingredients to the dry ingredients, mixing on low speed with an electric mixer until just combined. Do not overmix.
- Divide the batter evenly between the prepared cake pans.
- Bake for 25-30 minutes, or until a wooden skewer inserted into the center comes out clean.
- Let the cakes cool in the pans for 10-15 minutes before inverting them onto a wire rack to cool completely.
- **Prepare the Cream Cheese Frosting:**
- In a large bowl, using an electric mixer, beat the softened cream cheese and softened butter together on medium speed until smooth and creamy, about 2-3 minutes.
- Gradually add the sifted powdered sugar, one cup at a time, mixing on low speed until incorporated, then increase speed to medium and beat until light and fluffy.
- Beat in the vanilla extract. If using, add the heavy cream and beat until the frosting is light and airy. Be careful not to overbeat.
- **Prepare the Strawberries:**
- If desired, gently toss the sliced strawberries with 2 tablespoons of granulated sugar and let them sit for 10-15 minutes to release some juices. Drain any excess liquid before assembling.
- **Assemble the Cake:**
- Once the cake layers are completely cool, use a serrated knife to level the tops of the cakes if necessary.
- Place one cake layer on your serving plate or cake stand. Spread a generous layer of cream cheese frosting over the top.
- Arrange a layer of sliced strawberries over the frosting, leaving a small border around the edge.
- Carefully place the second cake layer on top. Spread another generous layer of frosting, then arrange more sliced strawberries.
- Place the third cake layer on top. Apply a thin crumb coat of frosting over the entire cake to seal in any loose crumbs. Chill the cake in the refrigerator for 15-20 minutes.
- Once chilled, apply the remaining cream cheese frosting to the top and sides of the cake, smoothing it with an offset spatula or bench scraper.
- Decorate the top of the cake with the reserved whole fresh strawberries.
- Chill the cake for at least 30 minutes before slicing and serving.
Notes
Ensure all dairy ingredients (buttermilk, cream cheese, butter, eggs) are at room temperature for a smooth, lump-free batter and frosting.
Do not overmix the cake batter; overmixing can lead to a tough cake. Mix until just combined.
For the most vibrant red color, use a high-quality gel food coloring.
Chill the cake layers completely before frosting to prevent the frosting from melting or sliding.
Store the finished cake in an airtight container in the refrigerator for up to 3-4 days.
Nutrition
- Calories: 550-650 per serving
- Fat: 30-40g per serving
- Carbohydrates: 70-85g per serving
- Protein: 6-8g per serving
FAQs
Why is it important for ingredients like buttermilk, cream cheese, and butter to be at room temperature?
The recipe specifically notes that ensuring all dairy ingredients, including buttermilk, cream cheese, butter, and eggs, are at room temperature is crucial for the best outcome. This allows them to combine smoothly and evenly, preventing lumps in both the cake batter and the frosting. Cold ingredients can cause the batter to seize up and prevent proper emulsification, resulting in a dense cake. For the frosting, softened butter and cream cheese will whip together into a smooth, creamy texture, ensuring a light and airy consistency that’s easy to spread. It makes a significant difference in the final quality of your cake.
What happens if I overmix the red velvet cake batter?
The instructions for preparing the red velvet cake layers explicitly advise against overmixing the batter after combining the wet and dry ingredients. Overmixing develops the gluten in the flour excessively, which can lead to a tough, dry cake with a chewy texture instead of the desired moist and tender crumb. To avoid this, mix on low speed with an electric mixer only until the ingredients are just combined. A few small lumps of flour are acceptable and will typically disappear during baking. Prioritizing a gentle mix ensures your cake retains its delicate texture.
Is macerating the strawberries with sugar necessary for the filling?
The recipe states that tossing the sliced strawberries with two tablespoons of granulated sugar is optional. Macerating the strawberries, which means letting them sit for 10-15 minutes after sugaring, helps them release some of their natural juices. This intensifies their flavor and creates a slightly syrupy texture, which can be a delightful addition to the filling. However, it’s crucial to drain any excess liquid before assembling the cake to prevent the layers from becoming soggy. If you prefer the natural sweetness and firmer texture of plain fresh strawberries, you can certainly skip this step entirely.
Why do I need to apply a crumb coat to the cake?
Applying a thin crumb coat of frosting is an essential step in the assembly process, as outlined in the instructions. After layering the cake with frosting and sliced strawberries, a light layer of frosting is spread over the entire cake to seal in any loose crumbs. This preliminary layer prevents crumbs from mixing into your final, visible frosting coat, ensuring a smooth, clean, and professional finish. Chilling the cake for 15-20 minutes after applying the crumb coat allows it to set, making it much easier to apply the final, thicker layer of frosting without disturbing the base.